Saturday, December 03, 2011

[占坑贴] Scala笔记

尽量简单的说,啥是Scala

在某种意义上,Scala是一种与Java平行的语言.它的源代码被编译成Java的bytecode,运行于Java虚拟机之上.正因为在JVM级是兼容的,Scala里可以调用Java的库. 这是用Scala写的HelloWorld程序
object HelloWorld extends App {
   println("Hello, world!")
}


那Scala和Java比有啥不一样的地方?

Scala这个语言的设计初衷是融合面向对象(OO)的设计思想(以C++,Java,Object C为代表)和函数式编程(functional programming)的思想(以Lisp,Haskell,ML为代表). Scala的设计优美的融合了这两种截然不同的风格.以quick sort为例,大家可以看一下Scala如何分别用普通的C风格和Haskell风格来实现:
def sort(xs: Array[Int]) {
  def swap(i: Int, j: Int) {
    val t = xs(i); xs(i) = xs(j); xs(j) = t
  }
  def sort1(l: Int, r: Int) {
    val pivot = xs((l + r) / 2)
    var i = l; var j = r
    while (i <= j) {
    while (xs(i) < pivot) i += 1
    while (xs(j) > pivot) j -= 1
    if (i <= j) {
      swap(i, j)
      i += 1
      j -= 1
    }
  }
  if (l < j) sort1(l, j)
  if (j < r) sort1(i, r)
}
sort1(0, xs.length - 1)
}
或者像Haskell那样写的:
def sort(xs: Array[Int]): Array[Int] = {
  if (xs.length <= 1) xs
  else {
    val pivot = xs(xs.length / 2)
    Array.concat(
      sort(xs filter (pivot >)),
      xs filter (pivot ==),
      sort(xs filter (pivot <)))
  }
}

支持Functional Programming有啥好处呢?

Functional programming language有着简洁,强大的表达能力,容易帮你写出bug-free的代码.另外在并行性上也有着优势。 比如在传说中那间以青年导师李开复老师为校长的CS四大牛校之一的CMU,大一新生首先学习Functional programming而不是传统的面向对象
具体到Scala,它支持如下几个Functional Programming的特性:
  • higher-order function(高阶函数)
  • anonymous function(匿名函数)
  • nested function()
  • curry(柯里化)
而有了对这几个特性的支持,Scala可以宣布自己支持First-class function。也就是说,函数是first-class citizen。注意这四个特性在Java中是不被支持的。

啥是Higher-order function

其定义是说函数本身可以作为其他函数的参数,或者返回值,或者赋值给一个变量。总而言之.
如果一个函数的参数可以为其他函数,那么这个函数被成为Higher-order function(高阶函数). C和Python都支持Higher-order function,但是Java本身是不支持的.一个Python的例子:
def f(x):
    return x + 3
 
def g(function, x):
    return function(x) * function(x)
 
print g(f, 7)
分别用Java和Scala来完成Wordcount这个经典的MapReduce应用: http://www.scala-blogs.org/2008/09/scalable-language-and-scalable.html 我们可以看到Scala的代码比Java的代码简介许多.
参考

Scala的官方网站: http://www.scala-lang.org/
一个不错的scala学习网站: http://www.simplyscala.com/
Scala by examples
A Tour of Scala

Monday, November 21, 2011

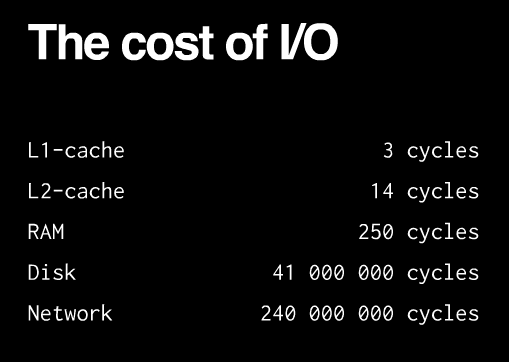
typical IO latency:


L1 cache: ~2 cpu cycle
L2 cache: ~20 cpu cycle
DDR3: ~10 ns
DDR2: ~15 ns
RDMA: < 1 us
infiniband: ~ 1 us
flash
  • read: ~50 us
  • write: ~ 15 - 80 us
eithernet: ~0.2 ms
HDD:
  • Average latency ~4ms
  • Random read seek ~10ms
  • Random write seek ~10ms
Internet: ~5-500 ms


Another source from http://blog.mixu.net/2011/02/01/understanding-the-node-js-event-loop/


Reference:
http://en.wikipedia.org/wiki/CAS_latency
Scalable High Performance Main Memory System Using PCM Technology"
http://www.fusionio.com/platforms/iodrive2/
http://www.intel.com/design/flash/nand/mainstream/index.htm

Wednesday, October 19, 2011

live with gnome-shell

开始使用gnome-shell了(被逼的).默认配置有诸多不爽之处(对我来说),记录一下:

1 窗口没有最小化按钮了,虽然你可以在窗口顶栏右键,但我很不习惯.
sol: $gconf-editor
然后把"/desktop/gnome/shell/windows/button_layout" 改成":minimize,maximize,close" (默认是":close")

ref: http://www.webupd8.org/2011/03/how-to-add-minimize-and-maximize.html

2 没有任务栏了
解决中...

Sunday, October 02, 2011

Currying in ML, Python, Javascript

ML

SMLNJ为例.
- fun sum x y = x + y;
val sum = fn : int -> int -> int
- val sum2 = sum 2;
val sum2 = fn : int -> int
- sum2 10;
val it = 12 : int

Python

可以使用functools来实现curry
>>>from functools import partial
>>>def sum(x,y): return x + y
>>>sum2 = partial(sum, 2)
>>>sum2
<functools.partial object at 0x1f2de0>
>>>sum2(10)
12

JavaScript

http://www.svendtofte.com/code/curried_javascript/

Friday, September 16, 2011

Cacheline prefetch

_mm_prefetch是一条SSE的指令.用于指导CPU如何去预取内存中的数据. 具体在C/C++代码里, 先需要#include <xmmintrin.h> 可以使用:

void _mm_prefetch(char * p , int i );
p为要预取数据的内存地址, i可以为_MM_HINT_T0, _MM_HINT_T1, _MM_HINT_T2, 或者 _MM_HINT_NTA中的一个. 他们的区别为:
  • PREFETCHT0 (T0): prefetch数据到所有级别cache, 包括L0 cache
  • PREFETCHT1 (T1): prefetch数据到所有级别cache, 但是除去L0 cache
  • PREFETCHT2 (T2): prefetch数据到所有级别cache, 但是除去L0和L1 cache
  • PREFETCHNTA: 将给定内存地址的数据prefetch到L2 cache的某个特定column上,这样如果这个内存地址的数据只是一次性的使用,就不会导致其他有用的cacheline被替换出cache. 好处是可以可以防止non-temporal 数据污染cache

Wednesday, September 14, 2011

static关键字在C/C++中的N种用法

static是C/C++中最让人抓狂的关键字,因为这个关键字被重载了太多不同的用法.要我说这就是C/C++这些语言设计崩坏的地方.

用法1:
在C中,如果用static修饰一个函数或者全局变量,那么这个函数或者变量仅仅为这个module中其他函数所见.所谓module就是这个C源文件的意思.这种用法实际上相当于Java或者C++中用private去修饰一个成员变量.这种用法下尽可能的使用static被认为是C程序员的良好习惯 -- C从设计上就对namespace问题苦手.

用法2:
在C++中,被static修饰的成员函数被称为静态成员函数.这种静态成员函数可以被"类名::函数名"来调用.

用法3:
C/C++中, 一个局部变量的声明如果被static修饰,那么该变量实际上不在运行栈上随着函数的调用和返回生灭,而是有一个全局的备份.换言之,这个变量类似于一个全局变量.  

Wednesday, July 20, 2011

[Windows]windbg kernel debugging

debugging virtual machine using windbg:
http://www.ndis.com/ndis-debugging/virtual/vmwaresetup.htm


    Steps:
  1. (One time) On host machine, install WinDbg
  2. On the target machine (i.e., the VM running on HyperV), ran following in cmd:
    bcdedit -debug on
    bcdedit -dbgsettings serial debugport:1 baudrate:115200
  3. In HyperV’s control panel, open the settings for the VM.  Under COM1, add a Named Pipe called “MyVIrtualCom1”.
  4. Create a shortcut for windbg on host machine, make it run as administrator (otherwise, you can not access the com). The command to run windbg is something like:
  5. C:\Debuggers\windbg.exe -y SRV*C:\symbols*http://msdl.microsoft.com/download/symbols -k com:port=\\.\pipe\MyVirtualCom1,pipe,resets=0,reconnect

Thursday, July 14, 2011

dumpbin: 查看binary文件所需要的symbols
VC自带的工具.
dumpbin /imports foo.sys

Friday, June 17, 2011

[Windows]dbg

cheating sheet ntsd: user mode debugger
kd: kernel mode debugger
windbg: GUI wrapp for ntsd and kd

最基本命令
.hh: 查看help
k: show call stack
r: show register
Q: quit dbg
bp: set breakpoint
  • bp foo!main
  • bp `source.c:31`
  • ba: set data breakpoint

p: step
pc: step to next call


kb: Dump the stack with Params
kn: Dump the stack with Frame #
kd: Dump stack dissassembly
~#s: Change to thread (Example: ~3s)
dd # - Dump the data (Example: dd 01f056548)
bl: list breakpoints
bd: disable breakpoint
bc: remove breakpoint
lm: system modules
x foo!*: 查看所有module foo的symbol
.sympath: 查看当前sympath
!sympath+“\\your_computer\path\to\your\pdb”: 添加路径到sympath中
!sym noisy/quiet: Generate verbose output from symbol loader
.srcpath: 查看当前srcpath
!srcpath+"\\your_computer\path\to\your\pdb": 添加路径到srcpath中


Kernel Mode Extension
!symfix: 碰到说nt symbols are incorrect please fix的时候运行
!reload: 重新读入symbols 包括kernel symbols, private symbols, user symbols.
!reload foo.sys: 重新读入foo.sys这个driver的symbols
!process: 查看所有进程
!process 0 0 myprocess.exe: 查看叫myprocess.exe的进程
!thread: 查看所有线程
!driveinfo: 驱动信息
!irp: IRP
!irpfind


读取symbol
!symfix
!reload
Connected to Windows 7 7601 x64 target at (Tue Jun 21 13:22:28.221 2011 (UTC - 7:00)), ptr64 TRUE
Loading Kernel Symbols
...............................................................
................................................................
............................
Loading User Symbols
................................................................
.........................
Loading unloaded module list
..........
显示driver object (比如kbdclass)
!drvobj kbdclass
Driver object (fffffa8007370870) is for:
 \Driver\kbdclass
Driver Extension List: (id , addr)
显示driver object (比如kbdclass)的dispatch routines
!drvobj kbdclass 7
Driver object (fffffa8007370870) is for:
 \Driver\kbdclass
Driver Extension List: (id , addr)

Device Object list:
fffffa8007a31ce0  fffffa800743d6c0  

DriverEntry:   fffff8800440becc kbdclass!GsDriverEntry
DriverStartIo: 00000000 
DriverUnload:  00000000 
AddDevice:     fffff880044083b4 kbdclass!KeyboardAddDevice

Dispatch routines:
[00] IRP_MJ_CREATE                      fffff88004401dd4 kbdclass!KeyboardClassCreate
[01] IRP_MJ_CREATE_NAMED_PIPE           fffff800034b58ac nt!IopInvalidDeviceRequest
[02] IRP_MJ_CLOSE                       fffff8800440217c kbdclass!KeyboardClassClose
[03] IRP_MJ_READ                        fffff88004402804 kbdclass!KeyboardClassRead
[04] IRP_MJ_WRITE                       fffff800034b58ac nt!IopInvalidDeviceRequest
[05] IRP_MJ_QUERY_INFORMATION           fffff800034b58ac nt!IopInvalidDeviceRequest
[06] IRP_MJ_SET_INFORMATION             fffff800034b58ac nt!IopInvalidDeviceRequest
[07] IRP_MJ_QUERY_EA                    fffff800034b58ac nt!IopInvalidDeviceRequest
[08] IRP_MJ_SET_EA                      fffff800034b58ac nt!IopInvalidDeviceRequest
[09] IRP_MJ_FLUSH_BUFFERS               fffff88004401ce0 kbdclass!KeyboardClassFlush
[0a] IRP_MJ_QUERY_VOLUME_INFORMATION    fffff800034b58ac nt!IopInvalidDeviceRequest
[0b] IRP_MJ_SET_VOLUME_INFORMATION      fffff800034b58ac nt!IopInvalidDeviceRequest
[0c] IRP_MJ_DIRECTORY_CONTROL           fffff800034b58ac nt!IopInvalidDeviceRequest
[0d] IRP_MJ_FILE_SYSTEM_CONTROL         fffff800034b58ac nt!IopInvalidDeviceRequest
[0e] IRP_MJ_DEVICE_CONTROL              fffff88004408a40 kbdclass!KeyboardClassDeviceControl
[0f] IRP_MJ_INTERNAL_DEVICE_CONTROL     fffff880044082b4 kbdclass!KeyboardClassPassThrough
[10] IRP_MJ_SHUTDOWN                    fffff800034b58ac nt!IopInvalidDeviceRequest
[11] IRP_MJ_LOCK_CONTROL                fffff800034b58ac nt!IopInvalidDeviceRequest
[12] IRP_MJ_CLEANUP                     fffff88004401afc kbdclass!KeyboardClassCleanup
[13] IRP_MJ_CREATE_MAILSLOT             fffff800034b58ac nt!IopInvalidDeviceRequest
[14] IRP_MJ_QUERY_SECURITY              fffff800034b58ac nt!IopInvalidDeviceRequest
[15] IRP_MJ_SET_SECURITY                fffff800034b58ac nt!IopInvalidDeviceRequest
[16] IRP_MJ_POWER                       fffff88004409fd4 kbdclass!KeyboardClassPower
[17] IRP_MJ_SYSTEM_CONTROL              fffff8800440a364 kbdclass!KeyboardClassSystemControl
[18] IRP_MJ_DEVICE_CHANGE               fffff800034b58ac nt!IopInvalidDeviceRequest
[19] IRP_MJ_QUERY_QUOTA                 fffff800034b58ac nt!IopInvalidDeviceRequest
[1a] IRP_MJ_SET_QUOTA                   fffff800034b58ac nt!IopInvalidDeviceRequest
[1b] IRP_MJ_PNP                         fffff88004403368 kbdclass!KeyboardPnP

列出当前所有irp
!irpfind

Scanning large pool allocation table for Tag: Irp? (fffffa8005481000 : fffffa8005781000)

  Irp    [ Thread ] irpStack: (Mj,Mn)   DevObj  [Driver]         MDL Process
fffffa8007375930 [00000000] Irp is complete (CurrentLocation 4 > StackCount 3)
fffffa8004f19520 [00000000] Irp is complete (CurrentLocation 2 > StackCount 1) 0x0000000000000000
fffffa8007dcfe10 [fffffa80081438f0] irpStack: ( e,2d)  fffffa8006e6eb10 [ \Driver\AFD]
fffffa8007ecdbc0 [fffffa80088a9b60] irpStack: ( e, 0)  fffffa8006aa4da0 [ \Driver\Beep]
...

特别查看某个irp (比如地址是fffffa8007dcfe10的这个)
!irp fffffa8007dcfe10
Irp is active with 4 stacks 4 is current (= 0xfffffa8007dcffb8)
 No Mdl: System buffer=fffffa8008dc7d80: Thread fffffa80081438f0:  Irp stack trace.  
     cmd  flg cl Device   File     Completion-Context
 [  0, 0]   0  0 00000000 00000000 00000000-00000000    

   Args: 00000000 00000000 00000000 00000000
 [  0, 0]   0  0 00000000 00000000 00000000-00000000    

   Args: 00000000 00000000 00000000 00000000
 [  0, 0]   0  0 00000000 00000000 00000000-00000000    

   Args: 00000000 00000000 00000000 00000000
>[  e,2d]   5  1 fffffa8006e6eb10 fffffa80086bfa30 00000000-00000000    pending
        \Driver\AFD
   Args: fffffa80081844b0 fffffa80081844b0 fffff88003f03150 fffffa8007ecf810
最后一行显示出这个irp的major function是e 也就是IRP_MJ_DEVICE_CONTROL

查看namespace里\Driver里的内容:
!object \Driver
Object: fffff8a00008b7f0  Type: (fffffa8004e83a90) Directory
    ObjectHeader: fffff8a00008b7c0 (new version)
    HandleCount: 0  PointerCount: 107
    Directory Object: fffff8a000004dc0  Name: Driver

    Hash Address          Type          Name
    ---- -------          ----          ----
     00  fffffa8006fbae70 Driver        nvlddmkm
         fffffa80069eae70 Driver        fvevol
         fffffa8005d2e890 Driver        iaStorV
...

查看_DRIVER_OBJECT的结构
dt nt!_DRIVER_OBJECT
   +0x000 Type             : Int2B
   +0x002 Size             : Int2B
   +0x008 DeviceObject     : Ptr64 _DEVICE_OBJECT
   +0x010 Flags            : Uint4B
   +0x018 DriverStart      : Ptr64 Void
   +0x020 DriverSize       : Uint4B
   +0x028 DriverSection    : Ptr64 Void
   +0x030 DriverExtension  : Ptr64 _DRIVER_EXTENSION
   +0x038 DriverName       : _UNICODE_STRING
   +0x048 HardwareDatabase : Ptr64 _UNICODE_STRING
   +0x050 FastIoDispatch   : Ptr64 _FAST_IO_DISPATCH
   +0x058 DriverInit       : Ptr64     long 
   +0x060 DriverStartIo    : Ptr64     void 
   +0x068 DriverUnload     : Ptr64     void 
   +0x070 MajorFunction    : [28] Ptr64     long 

Tuesday, June 14, 2011

[Windows]cmd命令笔记

删除一个文件夹foo所有内容
rd foo /s

查看当前所有进程(类似ps)
tasklist

杀死一个进程(类似kill)
taskkill

查找文件中出现的字符串
findstr

5秒内关机并重启
shutdown -r -t 5

Monday, June 13, 2011

[Winodws]内核驱动笔记

占坑
背景知识

用户模式(User Mode):
内核模式(Kernel Mode):
Win32 API:

C++注意事项

微软官方的文档C++ for Kernel Mode Drivers: Pros and Cons
求摘要?看这里Advanced C++ features and Kernel-mode programming don't mix


cmd或者在(Start->Run)运行msinfo32,然后选"software environment"->"system drivers"可以看到当前系统里所有安装了的驱动

编译

source文件相当于Linux/Unix下的Makefile. 如何写一个source文件? 参见http://randomlearningnotes.wordpress.com/2009/04/20/using-wdkddk-build-environment-for-drivers-and-non-drivers/

build 命令相当于Linux/Unix下的make

build /c 把所有obj文件全部删除再编译

build的output很少, 详细信息可以参见编译时生成的.log,.wrn和.err文件

disable所有编译优化: 在source 文件中加设置环境变量
MSC_OPTIMIZATION=/Od /Oi

debugview是一个可以用来查看kernel debug输出信息的工具. 可以connect到local machine来查看本机的, 也可以连接到remote机器上. 后者的方法是先在remote的机器上运行debugview /c, 接着使用debugview在local机器上

常用API

信号量
KeWaitForSingleObject 阻塞当前线程直至信号变量(比如一个event object)被置成signaled
KeSetEvent 把一个event object设为signaled
KeResetEvent 把一个event object重置成not-signaled

文件操作:
ZwReadFile: Read data from the file.
ZwWriteFile: Write data to the file.
ZwQueryInformationFile: Read metadata for the file or file handle.
ZwSetInformationFile: Write metadata for the file or file handle.

Saturday, May 28, 2011

Ubuntu添加删除ppa

添加一个ppa是一件很容易的事情, 比如添加ppa:ubuntu-toolchain-r/test(可以在11.04上装gcc-4.6)
$ sudo add-apt-repository ppa:ubuntu-toolchain-r/test
更新仓库软件列表
$ sudo apt-get update 

删除一个ppa并rollback到稳定版本稍微麻烦一些,需要下一个叫ppa-purge的工具先
$ sudo apt-get install ppa-purge
删除刚才添加的ppa
$ sudo ppa-purge ppa:ubuntu-toolchain-r/test
然后会自动帮你downgrade或者remove软件.

Wednesday, May 25, 2011

关于uint64_t(64位整数)的一些操作

显示

#include <inttypes.h>
#include <stdio.h>

int main()
{
  uint64_t a = 90;
  printf("test uint64_t : %" PRIu64 "\n", a);
  return 0;
}
如果是使用C++编译器编译上述代码,有时候会报如下错误
main.cpp: In function ‘int main()’:
main.cpp:9:30: error: expected ‘)’ before ‘PRIu64’
main.cpp:9:47: warning: spurious trailing ‘%’ in format [-Wformat]
解决方法是在inttypes.h这个头文件前加上一个__STDC_FORMAT_MACROS宏定义
#define __STDC_FORMAT_MACROS
#include <inttypes.h>

左移

对于32bit或者更短的的integer, 1左移x位就是 1≤≤x
但是对于64bit的integer, 比如unsigned long long或者uint64_t, 1≤≤32却是0. 如果需要2^32或者更大的数, 需要用1ULL≤≤32

http://cboard.cprogramming.com/c-programming/62790-bitshift-64-bit-integers.html

#include <stdio.h>
#include <stdint.h>
#include <inttypes.h>

int main( void )
{
   uint64_t a = 1ULL << 32;
   uint64_t b = 1 << 32;
   printf( "a = %016"PRIx64", b = %016"PRIx64"\n",  a, b);
   return 0;
}
a = 0000000100000000, b = 0000000000000000

Friday, May 20, 2011

[Linux/Mac]编译相关的工具和命令

GNU make的常用变量

  • CFLAGS: C compiler的flags,会被传递给关于C代码的compile和link的命令
  • CXXFLAGS: C++ compiler的flags,会被传递给关于C++的compile和link的命令
  • CPPFLAGS: C PreProcessor的flags(注意,不要和CXXFLAGS混淆)。它会被传递给编译C以及C++代码的命令
  • LDFLAGS: linking阶段的选项。常用来指定一些库文件的位置 比如"-L/usr/local/Cellar/gettext/0.18.1.1/lib"
  • CC: C Compiler。比如"gcc", "cc"
  • CXX: C++ Compiler。比如"g++"
参考:
http://stackoverflow.com/questions/495598/difference-between-cppflags-and-cxxflags-in-gnu-make

autoconf

根据configure.ac生成configure文件
$ autoconf configure.ac > configure
$ chmod +x configure
$ ./configure
参见A brief introduction to autoreconf
http://sourceware.org/autobook/autobook/autobook_toc.html#SEC_Contents

autoreconf

根据configure.ac, 会调用autoconf, autoheader, aclocal, automake, libtoolize, 以及autopoint等工具生成configure文件. 然后configure再根据Makefile.am生成Makefile
$ autoreconf -is
$ ./configure
$ make
参见Using autoreconf to Update configure Scripts

configure

增加额外的编译参数(比如默认的configure找不到某个包,就需要显式的告诉它路径)
Bash底下
$ LDFLAGS="-L/opt/local/lib" CXXFLAGS="-I/opt/local/include"\
 PKG_CONFIG_PATH="/usr/local/lib/pkgconfig/" ./configure
或者csh底下
$ env LDFLAGS="-L/opt/local/lib" CXXFLAGS="-I/opt/local/include"\
 PKG_CONFIG_PATH="/usr/local/lib/pkgconfig/" ./configure
configure的常用参数包括
  • --prefix: 通常默认为 "--prefix=/usr/local"
  • --enable-shared: build shared libraries,否定为"--enable-shared=no"或者"--disable-shared"
  • --enable-static: build static libraries,否定为"--enable-static=no"或者"--disable-static"

ldd

显示一个可执行文件或者一个shared library文件(.so文件)所dependent的其他.so文件
$ ldd a.out 
 linux-vdso.so.1 =>  (0x00007fff4c5ff000)
 libm.so.6 => /lib/x86_64-linux-gnu/libm.so.6 (0x00007f55df989000)
 libc.so.6 => /lib/x86_64-linux-gnu/libc.so.6 (0x00007f55df5ea000)
 /lib64/ld-linux-x86-64.so.2 (0x00007f55dfc3b000)

nm

查看一个obj文件的symbol table
$ nm mypair.o
000001c4 s EH_frame1
000001a5 s __GLOBAL__I_mypair.cc
00000254 s __GLOBAL__I_mypair.cc.eh
00000153 s __Z41__static_initialization_and_destruction_0ii
0000022c s __Z41__static_initialization_and_destruction_0ii.eh
         U __ZNKSs4sizeEv
         U __ZNKSsixEm
         U __ZNSt8ios_base4InitC1Ev
         U __ZNSt8ios_base4InitD1Ev
0000012c S __ZSt3minImERKT_S2_S2_
000001e0 S __ZSt3minImERKT_S2_S2_.eh
00000000 t __ZStL17__verify_groupingPKcmRKSs
00000204 s __ZStL17__verify_groupingPKcmRKSs.eh
000002a8 b __ZStL8__ioinit
         U ___cxa_atexit
         U ___dso_handle
         U ___gxx_personality_v0
00000104 t ___tcf_0
00000278 s ___tcf_0.eh

strip

减小一个可执行文件的size。代码体积变小后可能会对icache有帮助。代价是symbol table等帮助debug的信息会被移除。
$ strip a.out

pkg-config

pkg-config相当于一个数据库,用以维护系统中那些已经安装了的library。
比如你可以通过--modversion来查询某个library的版本
$ pkg-config --modversion openssl
0.9.8j
也可以用--cflags以及--libs查询在Makefile里使用一个library所需要使用的include的路径和其他选项。比如:
$ pkg-config --cflags thrift
-I/usr/local/include/thrift  
$ pkg-config --libs thrift  
-L/usr/local/lib -lthrift
pkg-config中的library数据库是通过搜索特定路径下的一系列xxx.pc文件来建立的。每个.pc文件对应一个library,包括了这个library的一些metadata。可以通过如下命令来查看当前数据库中包含了哪些library了。
$ pkg-config --list-all

Tuesday, May 17, 2011

Indefero

在Indefero上new了一个project之后, 想用git pull一个空的source tree下来.但是发现git总是报错
Cloning into hashfilter...
fatal: '/var/local/indefero/git/repositories/myproj.git' does not appear to be a git repository
fatal: The remote end hung up unexpectedly
折腾了很久, 后来发现原来Indefero上新建的project是没有repo的. 第一次使用的时候需要自己import.所以要在自己的目录里
git init
git add .
git commit -m "initial import"
git remote add origin git@a.b.c.d:yourproj.git
git push origin master
然后就可以在Indefero上看见自己的source tree了

Friday, May 13, 2011

Hash, Hash and Hash

(更新中)
Universal Hashing
A probability distribution H over hash functions from U to $\{1, \ldots, M\}$ is uni-
versal if for all x = y in U , we have
$$
Pr\{h(x) == h(y)\} \leq 1/M
$$

换言之当h是从H中随机选取,任何两个元素collide的概率不超过1/M.

(c,k)-Universal Hashing
$\{h_i\} h_i : U \to R$, for any distinct elements $x_1,\ldots,x_k \in U$, and $y_1,\ldots,y_k \in R$, we have
$$
Pr\{h_i(x_1) = y_1,\ldots, h_i(x_k) =y_k\} \leq c/|R|^k
$$

Monday, May 09, 2011

[Linux]Ubuntu 11.04(Natty)上安装gcc-4.6

gcc-4.6没有进Natty默认的repo.
可以从ppa源里安装
https://launchpad.net/~ubuntu-toolchain-r/+archive/test

Sunday, May 08, 2011

[Linux]关于用户,组

增加用户foo
sudo adduser foo

把用户foo添加到group admin当中(这样foo就可以sudo)
sudo adduser foo admin

增加组bar
sudo addgroup bar

查看某个用户foo所属的组
groups foo

Saturday, May 07, 2011

[Linux]IRQ

中断请求IRQ
http://www.mjmwired.net/kernel/Documentation/IRQ.txt
IRQ是来自某个设备(比如NIC,Harddisk,SSD等)的请求,请求CPU给于处理
为了识别来自不同设备的IRQ, 每个中断来源都被分配了一个数字(也就是IRQ number).
/proc/interrupts中记录了当前各种IRQ的number和它们的来源:
$cat /proc/interrupts
           CPU0       CPU1       
  0:        570          0   IO-APIC-edge      timer
  1:          2          0   IO-APIC-edge      i8042
  7:          0          0   IO-APIC-edge      parport0
  8:          1          0   IO-APIC-edge      rtc0
  9:          0          0   IO-APIC-fasteoi   acpi
 12:          4          0   IO-APIC-edge      i8042
 16:          0          0   IO-APIC-fasteoi   uhci_hcd:usb3
 17:          0          0   IO-APIC-fasteoi   uhci_hcd:usb4, uhci_hcd:usb6
 18:          0          0   IO-APIC-fasteoi   uhci_hcd:usb7
 20:    1104815          0   IO-APIC-fasteoi   ata_piix, ata_piix
 22:     187848          0   IO-APIC-fasteoi   ehci_hcd:usb1
 23:       1110          0   IO-APIC-fasteoi   ehci_hcd:usb2, uhci_hcd:usb5
 43:    4747272          0   PCI-MSI-edge      radeon
 44:      97360          0   PCI-MSI-edge      hda_intel
 45:    4284421          0   PCI-MSI-edge      eth0
NMI:          0          0   Non-maskable interrupts
LOC:   36071250   31250448   Local timer interrupts
SPU:          0          0   Spurious interrupts
PMI:          0          0   Performance monitoring interrupts
IWI:          0          0   IRQ work interrupts
RES:    1218335     677796   Rescheduling interrupts
CAL:       3889       6659   Function call interrupts
TLB:     137697     175959   TLB shootdowns
TRM:          0          0   Thermal event interrupts
THR:          0          0   Threshold APIC interrupts
MCE:          0          0   Machine check exceptions
MCP:        533        533   Machine check polls
ERR:          1
MIS:          0
比如这里可以看出,我的机器有两个CPU(其实是dual core)

IRQ SMP Affinity
http://www.cs.uwaterloo.ca/~brecht/servers/apic/SMP-affinity.txt


irqbalance
http://www.irqbalance.org/documentation.html

Thursday, May 05, 2011

[Linux]中文字体美化笔记

升级到Ubuntu 11.04之后, 突然中文设置全都混乱了.于是只好重新设置.笔记一下以免下次再出现.我主要是设置firefox和fontconfig的字体替换.

背景知识
有衬线(Serif) 无衬线 (Sans Serif)和等宽(Monospace)字型
  • 1 有衬线(Serif)字型是比较正式的字体,比划粗细不一,在笔划的边缘有装饰部分(我的理解是有笔锋)。英文当中比较有名的包括 Times New Roman, Georgia, 而中文当中则是包括大名鼎鼎的宋体,明体(繁体宋体在港台的叫法)。Serif font 的好处是看起来比较容易辨认,我自己觉得读起来速度会快。
  • 2 无衬线(Sans Serif)是比较活泼一些的字体,比划粗细一致。。英文当中包括Arial, Helvetica, Tahoma, Verdana等,而中文则是包括黑体,幼圆,仿宋好像也算是sans serif。要注意的是,这里的"黑体"有时会造成歧义,如要表达Bold的字体,可能粗体是更恰当。Sans Serif 的好处,据说字体小的时候看起来比较舒服。
  • 3 等宽(Monospace)字型顾名思义就是每个字母的宽度相同。通常显示代码的时候用等宽的字体会比较整齐. 另外命令行(Console)里面也用等宽字体比较好看。比较有名的是Courier。 我是Dejavu Sans Mono的忠实粉丝。

DPI
DPI=Dots per inch. 在显示器里可以理解为一英寸长要多少像素。Windows 以及Firefox (all platform)里的默认值为96。以前的话这个值是和大多数显示器差的不会太远。但是很多现在的显示器可以支持到更高(比如我的Macbook Pro的LCD就是110)。那么如果还设定DPI=96,相应的字体就会显小。所以可以首先确定自己系统里设定的DPI是否正确。

字体的单位
Font的大小分为pointsize(单位是pt磅)和pixelsize(单位是px像素).两者换算的关系可参考 http://www.emdpi.com/fontsize.html . 简单说来关于磅和像素这两个单位的换算关系是:1磅=1/72英寸,而1英寸= DPI 像素。 所以一个 X pt 的字,折合 X*DPI/72 px.
Linux系统里面容易混淆的地方是不同地方的设置用的不同的单位. 比如GNOME桌面设置字体的时候,单位是磅(pt)而而Firefox当中字体的设置用的是像素(px).

GNOME设置字体
首先在桌面右键->"Change Desktop Background"->"Font",会出现如下的面板

注意这里的单位是磅(pt)

Firefox设置字体
firefox设置起来很简单. 以Firefox 4为例, 在Edit->Preference->Content->Advanced 面板里, 选择是否允许使用网页指定的字体:
  • 如果你允许网页自己选择字体,则直接跳至fontconfig的设置. 我自己是这么选的---不然网页字体都那么千篇一律,多无聊阿).
  • 如果不允许网页自己指定的字体,则在对于中文(Simplified Chinese)字符集和西文(Western)字符集分别设置Serif, Sans Serif, Monospace三种字型的默认字体.这里字体大小的单位是px(像素),而不是pt(磅).

    但是有时候浏览器自己侦测的网页语言字符集是不对的, 或者有时候就是中文西文混合的(比如上facebook),这样就造成一个两难的局面: 网页语言detect错误时,以英文字体设置显示中文会很丑或者很虚. 如果干脆把浏览器的英文字体也都默认成中文--可是这样上英文网页就会崩溃因为几乎所有的中文字体的英文部分都太丑了.所以需要进行下一步,在fontconfig里做字体替换

fontconfig设置字体
设置fontconfig的作用在于你可以手动设置系统什么时候用什么中文字体.比如系统知道自己要显示一段Sans Serif的文字,英文部分好说,咣咣弄好了, 但是中文部分它不知道得用什么字体.于是你可以在fontconfig里设置,使得它可以用微软雅黑(Microsoft YaHei)来显示那部分中文,这就是字体替换.对自己账户的fontconfig设置在~/.fonts.conf中.
关于fontconfig设置的用法,参考http://linux.die.net/man/5/fonts-conf

这里附上我的~/.fonts.conf文件.
<?xml version="1.0"?>
<!DOCTYPE fontconfig SYSTEM "fonts.dtd">
<fontconfig>
  <match target="pattern">
    <test qual="any" name="family">
      <string>serif</string>
    </test>
    <edit name="family" mode="prepend" binding="strong">
      <string>Times New Roman</string>
      <string>Times</string>
      <string>Georgia</string>
      <string>Bitstream Vera Serif</string>
      <string>DejaVu Serif</string>
      <string>SimSun</string>
      <string>NSimSun</string>
      <string>Microsoft YaHei</string>
    </edit>
  </match> 
  <match target="pattern">
    <test qual="any" name="family">
      <string>sans-serif</string>
    </test>
    <edit name="family" mode="prepend" binding="strong">
      <string>DejaVu Sans</string>
      <string>Ubuntu</string>
      <string>Arial</string>
      <string>Helvetica</string>
      <string>Microsoft YaHei</string>
    </edit>
  </match> 
  <match target="pattern">
    <test qual="any" name="family">
      <string>monospace</string>
    </test>
    <edit name="family" mode="prepend" binding="strong">
      <string>DejaVu Sans Mono</string>
      <string>Courier</string>
      <string>Courier New</string>
      <string>Microsoft YaHei</string>
    </edit>
  </match> 
</fontconfig>
有几点说明:
1 因为宋体(比如SimSun, NSimSun)被认为是Serif, 所以我把他们放在了Serif里
2 黑体(比如Microsoft YaHei)是Sans Serif,所以放在了Sans Serif那类
3 因为所有中文字体大小都一样,所以Monospace那里随便用神马字体都可以, 我个人喜欢Microsoft YaHei

Tuesday, May 03, 2011

node.js 学习笔记

占坑先
node.js提供一种framework使得我么可以在server端运行的javascript 如果你是一个新手,务必请先读一下这篇Understand Node.js, 写的非常非常好. 参考
一个对于新手来说很不错的tutorial http://www.nodebeginner.org
Understand node.js event loop

使用minicom给firmware升级

接上串口以后, 在你的主机上运行
minicom
重启board, minicom的屏幕上会出现菜单
1......Program Flash via XModem Download
2......Version
3......Boot System
选择1 ,然后确认. 这时候出现
Erasing blocks ............

Start XModem dowmload...
这个时候先按几下回车,再接着按Ctrl-a s表示send文件, 然后出现如下的菜单来选择不同的protocol
+-[Upload]--+
| zmodem    |
| ymodem    |
| xmodem    |
| kermit    |
| ascii     |
+-----------+
选择xmodem,这时候会出现文件对话框,让你选择哪一个bin文件来升级BIOS. 选择之后, 我发现总是出现incomplete 或者根本就没有progress. 需要多send几次. 就可以了

Wednesday, April 27, 2011

[Linux] filesystem的几个命令

查看filesystem type

$ df -T
Filesystem    Type   1K-blocks      Used Available Use% Mounted on
10.103.0.1:/nfsroot
               nfs   230583296 137044992  81824768  63% /
none      devtmpfs      497684       220    497464   1% /dev
none         tmpfs      502108         0    502108   0% /dev/shm
tmpfs        tmpfs      502108         0    502108   0% /tmp
none         tmpfs      502108        48    502060   1% /var/run
none         tmpfs      502108         0    502108   0% /var/lock
none         tmpfs      502108         0    502108   0% /lib/init/rw
/dev/sda1     ext4   115377640    192116 109324612   1% /localfs

查看硬盘

sudo fdisk -l /dev/sda
Disk /dev/sda: 500.1 GB, 500107862016 bytes
255 heads, 63 sectors/track, 60801 cylinders, total 976773168 sectors
Units = sectors of 1 * 512 = 512 bytes
Sector size (logical/physical): 512 bytes / 512 bytes
I/O size (minimum/optimal): 512 bytes / 512 bytes
Disk identifier: 0x0000c821

   Device Boot      Start         End      Blocks   Id  System
/dev/sda1   *        2048      499711      248832   83  Linux
/dev/sda2          501758   976771071   488134657    5  Extended
/dev/sda5          501760   976771071   488134656   8e  Linux LVM

格式化硬盘

首先使用fdisk在硬盘上建立partition
$ sudo fdisk /dev/sda
然后格式化
$ sudo mkfs.ext4 /dev/sda1
mke2fs 1.41.11 (14-Mar-2010)
Filesystem label=
OS type: Linux
Block size=4096 (log=2)
Fragment size=4096 (log=2)
Stride=0 blocks, Stripe width=0 blocks
4890624 inodes, 19537040 blocks
976852 blocks (5.00%) reserved for the super user
First data block=0
Maximum filesystem blocks=4294967296
597 block groups
32768 blocks per group, 32768 fragments per group
8192 inodes per group
Superblock backups stored on blocks: 
        32768, 98304, 163840, 229376, 294912, 819200, 884736, 1605632, 2654208, 
        4096000, 7962624, 11239424

Warning: could not read block 0: Attempt to read block from filesystem resulted in short read
Writing inode tables: 151/597
mount硬盘

$ sudo mount -t ext4 /dev/sda1 /my/mountpoint
$ sudo chown binfan:root /my/mountpoint
Ref
http://www.tldp.org/HOWTO/Partition/fdisk_partitioning.html

Sunday, April 17, 2011

关于diff, colordiff

diff常用于比较两个文件的不同:
diff path_to_file1 path_to_file2
可以用-y(或者--side-by-side)来分两列显示diff区别
diff --side-by-side path_to_file1 path_to_file2


diff还可以比较两个文件夹的不同,列出所有不同的文件的不同之处
diff -r path_to_dir1 path_to_dir2
还可以用-q(或者--brief)只显示哪些文件不同
diff --brief -r path_to_dir1 path_to_dir2


colordiff是diff的一个wrap,可以把diff的输出加上不同的色彩.所以通常能用diff的场合都可以放心的改成colordiff.也可以简单的在你的shell启动配置(比如.bashrc)里加上
alias diff=colordiff
关于colordiff的全局设置--比如什么输出配什么颜色--在/etc/colordiffrc当中.你可以把该文件拷贝至~/.colordiffrc然后自行修改.

如果希望svn diff使用colordiff(svn默认使用它自己内建的diff),修改~/.subversion/config文件,加上
diff-cmd = colordiff

Friday, April 15, 2011

[算法]关于字符串的算法

判断字符串的匹配(一个字符串是否在另一个字符串中出现):
KMP, 时间复杂度 线性, O(n)


找出k个字符串的最长公共子字符串(每个字符串长度不超过n):
使用suffix tree. 对于每个字符串建立一棵suffix tree的时间是线性O(n),合并这k棵suffix tree, 然后寻找合并过的大树中拥有属于所有string的最深的节点.


两个文件,各自拥有很多单词.寻找在两个文件中重复出现的单词:
可以用feed-forward bloom filter

Thursday, April 14, 2011

tmux: 更好的screen

tmux是什么?

tmux和screen和类似(关于screen的用法, 参见我写的screen小结).对我来说它比screen优越的地方是,它允许你在一个terminal上窗口上分割成多个tty,这样可以充分利用屏幕而不用来回切换. 比如下图:
你可以使用热键方便的在切割而成的不同的pane间切换.

怎么安装tmux?

Ubuntu下很简单
$sudo apt-get install tmux
在MacOS下可以用port
$sudo port install tmux

哪里有关于tmux的文档?

tmux官方主页
这个写得很赞: Tmux: a crash course
一个写的很好的tutorial:part1, part2
switching from gnu screen to tmux
http://wiki.frugalware.org/index.php/Tmux

tmux怎么使用?

和screen的比较:
功能 screen命令 tmux命令
查看当前session
$screen -ls
$tmux ls
$tmux list-sessions
重入的session
$screen -r
$screen -r session-name
$tmux attach
$tmux attach -t session-id
新建一个session,
执行一个shell命令(比如top)并立刻detach
$screen -m -d top
$screen -S session-name -m -d top
$tmux new-session -d top
发送指令(比如退出)到一个session中
$screen -X quit
$screen -S session-name -X quit
$tmux kill-session
$tmux kill-session -t session-id

Wednesday, April 06, 2011

[Linux]Ubuntu下网络设置

配置网卡IP地址

1 修改/etc/network/interfaces 设置各个网卡地址(DHCP或者静态)
比如下面将第一块以太网卡(eth0)设为DHCP
# The primary network interface
auto eth0
iface eth0 inet dhcp
或者静态绑定IP地址
auto eth0  
iface eth0 inet static  
address 192.168.0.103  
gateway 192.168.0.1  
netmask 255.255.255.0
2 重启网络使新设置生效
/etc/init.d/networking restart


设置DNS

修改/etc/resolv.conf设置DNS服务器的地址. 比如我的DNS服务器为10.212.3.3
nameserver 10.212.3.3
domain apc999.net
search apc999.net


配置SSH Server

1 安装openssh-server
$apt-get install openssh-server
2 修改/etc/ssh/ssh_config可以设置诸如端口(默认是22)等设置.
3 重启ssh server
$sudo /etc/init.d/ssh restart


配置DHCP Server

http://www.ubuntugeek.com/how-to-install-and-configure-dhcp-server-in-ubuntu-server.html
1 安装dhcp3-server
$apt-get install dhcp3-server
2 设置dhcp server
$sudo vi /etc/default/dhcp3-server
把INTERFACES=""改成INTERFACES="eth0" (假设你是要在eth0上做dhcp server)
$sudo vi /etc/dhcp3/dhcpd.conf
根据具体要求做修改
3 重启dhcp3-server
$sudo /etc/init.d/dhcp3-server restart


配置DNS Server

http://ubuntuforums.org/showthread.php?t=236093
可以选择bind9
1 安装dns server
$sudo apt-get install bind9
也可以选择dnsmasq. dnsmasq是一个轻量级的dns/dhcp/tftp server


配置NFS Server

1 安装NFS server
$apt-get install nfs-kernel-server
2 修改/etc/exports
比如要把/share目录共享给192.168.1.0这个网络,增加如下行
/share       192.168.1.0/24(rw,fsid=0,insecure,no_subtree_check,async)
3 重启NFS server
$sudo /etc/init.d/nfs-kernel-server restart


配置tftp Server

http://www.davidsudjiman.info/2006/03/27/installing-and-setting-tftpd-in-ubuntu/
tftp是trivial file transfer protocol的缩写. tftp比ftp功能弱.但是因为简单,常用于net boot 等应用上.tftp-hpa是一个加强版的tftpd
1 安装tftp-hpa
$apt-get install tftp-hpa
2 tftp可以使用xinetd, 所以我们修改/etc/xinetd.d/tftp,让它看起来差不多如下:
service tftp
{
        disable                 = no
        socket_type             = dgram
        wait                    = yes
        user                    = root
        server                  = /usr/sbin/in.tftpd
        server_args             = -v -s /var/lib/tftpboot
        only_from   = 192.168.0.0/24
        interface   = 192.168.0.1
}
这里我们的tftpd面向192.168.0这个网络,tftp的共享目录在/var/lib/tftpboot. 注意user要在设定的目录中有权限, 不然会有问题.
3 重启tftpd-hpa(通过重启xinetd)
sudo /etc/init.d/xinetd start


PXE Boot Server

PXE Boot使得一台机器的BIOS通过请求一个TFTP服务器来得到一个可以boot的linux image --- 就像你在这台机器上插入了一个CD来boot一样.
1 设置TFTP Server,
2 设置DHCP Server
3 创建或修改/var/lib/tftpboot/pxelinux.cfg/default, 这个文件用来设定PXE启动使用默认使用的Linux 镜像. 比如我的设定是:
LABEL linux
KERNEL vmlinuz-2.6.32-21-server
APPEND root=/dev/nfs initrd=initrd.img-2.6.32-21-server nfsroot=10.103.0.1:/nfsroot boot=nfs ip=dhcp rw --
注意你需要把initrd.img-2.6.32-21-server和vmlinuz-2.6.32-21-server这两个文件放在/var/lib/tftpboot底下.这样使用PXE启动的机器就可以通过tftp来下载Linux内核镜像来启动.


配置iptables实现NAT

(如果是Ubuntu用户可以使用ufw(Uncomplicated Firewall)来配置iptables)
https://help.ubuntu.com/10.04/serverguide/C/firewall.html
http://www.howtoforge.com/nat_iptables

设置IP FORWARDing and Masquerading
iptables --table nat --append POSTROUTING --out-interface eth0 -j MASQUERADE
iptables --append FORWARD --in-interface eth1 -j ACCEPT
如果希望每次启动的时候都加载这些iptables设定, 先把这些rules存到一个文件中(比如IP_FORWARDING):
iptables-save > /etc/IP_FORWARDING
然后修改/etc/network/interfaces
auto eth0
iface eth0 inet dhcp
 pre-up iptables-restore < /etc/IP_FORWARDING
让kernel选择packet forwarding
echo 1 > /proc/sys/net/ipv4/ip_forward
也可以修改/etc/sysctl.conf使得默认的ip_forward为1.
# Uncomment the next line to enable packet forwarding for IPv4
net.ipv4.ip_forward=1
重要命令
ifup ifdown ifconfig hostname设置主机名称, 比如
$hostname   #显示当前主机名称
$sudo hostname foo  #设定当前主机名称为foo
参考:
Setting up Network Interfaces Debian Network Setup ubuntu 10.10 Network config

Tuesday, April 05, 2011

tweak your thunderbird for gmail

http://lifehacker.com/#!314574/turn-thunderbird-into-the-ultimate-gmail-imap-client

Sunday, March 27, 2011

libc interface v.s. system call

啥是System Call

$man 2 intro
INTRO(2)                                                Linux Programmer's Manual                                               INTRO(2)

NAME
       intro - Introduction to system calls

DESCRIPTION
       Section  2 of the manual describes the Linux system calls.  A system call is an entry point into the Linux kernel.  Usually, sys‐
       tem calls are not invoked directly: instead, most system calls have corresponding C library wrapper functions which  perform  the
       steps  required (e.g., trapping to kernel mode) in order to invoke the system call.  Thus, making a system call looks the same as
       invoking a normal library function.


每个system call都有一个number在<syscall.h>中. system call列表在Linux Kernel Source的arch/i386/kernel/entry.S中.

strace: 跟踪一个程序, 输出程序执行过程中所调用的system call

$strace ls 
execve("/bin/ls", ["ls"], [/* 25 vars */]) = 0
brk(0)                                  = 0x25b3000
access("/etc/ld.so.nohwcap", F_OK)      = -1 ENOENT (No such file or directory)
mmap(NULL, 8192, PROT_READ|PROT_WRITE, MAP_PRIVATE|MAP_ANONYMOUS, -1, 0) = 0x7f7c0f616000
access("/etc/ld.so.preload", R_OK)      = -1 ENOENT (No such file or directory)
open("/etc/ld.so.cache", O_RDONLY)      = 3
fstat(3, {st_mode=S_IFREG|0644, st_size=144586, ...}) = 0
...

System Call Reference

lisp笔记

编程环境

Emacs的用户显然有福. 在Emacs中,可以用M-x ielm进入Emacs自带的lisp解释器

第一段代码:Hello World

ELISP> (print "Hello world")
"hello world"

读入编辑好的lisp文件

ELISP> (load "~/test.lisp")

四则运算

ELISP> (* 7 10)    ;计算7*10
70
ELISP>(* 2 ( cos 0) (+ 4 6))     ;计算2*cos(0)*(4+6)
20.0

循环

ELISP> (loop for i in '(1 2 3) do (print i))
1
2
3
其他loop方式

定义函数

ELISP>(defun multiply-by-seven (number)
         (* 7 number))
multiply-by-seven
ELISP>(multiply-by-seven 10)
70

参考

[1]GNU Emacs Lisp

Thursday, March 24, 2011

aspell

安装aspell
MacOS
$sudo port install aspell
$sudo port install aspell-dict-en

修改~/.emacs
(setq ispell-program-name "aspell")

rsync

参考
Rsync on Ubuntu

同步两个目录的文件src和dst,两个文件可以在同一台机器上:
$rsync -a /home/path/src/ /home/path/dst/
两个文件也可以在不同的机器上, 比如从远端同步到本地:
$rsync -a -e ssh apc999@host:/home/path/src/ /home/path/dst/
或者从本地同步到远端:
$rsync -a -e ssh /home/path/src/ apc999@host:/home/path/dst/

一个稍微复杂些的例子:
将本目录文件(除 .svn文件外)同步到host上,保持所有文件属性
rsync --delete -azvv --exclude '.svn*' -e ssh . apc999@host:~/foo/
选项:
  • -a: 保持文件的时间权限等属性
  • -z: 在传输中压缩
  • -b: 如果覆盖一些文件,备份被覆盖的文件
  • -e: 指定remote shell
  • -r: 递归同步子目录
  • -v: verbose,显示详细的输出
  • --delete: 删除dst中src没有的文件
  • --exclude: 对于某些文件不进行同步

Friday, March 18, 2011

英语,paper, 总结一下

每句在20个单词左右, 避免过长或过短.亲!!!!!!!!!!!!!!!!!!!!!!!!

句式保持变化, 每句都用we开头是非常口语的, 有木有!!!!!!!!!!!!!!!!

单数可数名词记得加冠词.冠词伤不起啊!!!!!!!!!!!!!!!!!!!!!!!!!

不要用following contributions, 直接说three controbutions,有木有!!!!!!!!!!!!

Friday, March 11, 2011

SSD notes

Cell: SLC(Single Level Cell)每一个cell可以存储一个bit,而MLC(Multiple Level Cell)每一个cell可以存储多个bit. MLC有更高的存储密度, 但是读和写一个cell也要花上更多时间.

Page: SSD一般把多个Cell组织成一个page,page的大小通常是4KB. page是SSD上读和写的最小单位.

Block: 而128个page又被组织成一个512KB大小的block. block是擦除数据的最小单位.

TRIM: 当要写的page为空的时候, 可以直接在这个page上写. 然而当这个page不为空的时候, 就需要把这个page所属于的block读入内存,然后在内存中改写相应的page内容,把SSD上的block完全擦除,再写入更改过后的block. 所以哪怕只是做一个bit的改动, 也需要完成上述步骤. 所以在SSD上做in-place或者random的写代价是非常的昂贵. 另外频繁的擦写也会对SSD的寿命造成损害因为一块MLC的SSD通常只能被反复擦写10000次.

这种独特的读写特性也给传统的文件系统带来的"困扰".比如文件系统通常自己维护可用page的信息并进行分配,而不会告知底层存储设备某个page的数据是依然有效还是已经被删除. 一旦有新的数据需要写入一个已有数据的page,就有可能需要等待先要擦除整个block,造成写的性能降低. 为了解决这个问题,很多SSD都支持TRIM这个功能来和操作系统交互. 当操作系统删除一个文件的时候, 除了更新文件系统外还会给SSD设备发送TRIM命令来告知这些文件占据的page已经不需要保存. 这样SSD可以提前用昂贵的block擦除更新把这些page清空. 在下次写的时候就不需要等待整个block的更新了.

Tuesday, March 01, 2011

[Linux]查看/控制登陆

查看最近登陆情况
last

或者查看/var/log/auth.log也可以找到被记录的登陆信息

修改/etc/hosts.allow
sshd:    1.2.3.4,  5.6.
这样可以让ip为1.2.3.4以及处于网段5.6.的client通过ssh登陆本机
修改/etc/hosts.deny
sshd:    all
这样除了hosts.allow中定义的ip外所有链接全部拒绝

Sunday, February 27, 2011

测试硬盘IO性能的工具

hdparm - get/set hard disk parameters
测量使用bufferedIO(默认)的throughput
$ sudo hdparm -t  /dev/sda1 
/dev/sda1:
 Timing buffered disk reads:  344 MB in  3.00 seconds = 114.55 MB/sec
测量使用directIO的throughput
$ sudo hdparm -t --direct /dev/sda1 
/dev/sda1:
 Timing O_DIRECT disk reads:  572 MB in  3.01 seconds = 190.08 MB/sec

iozone - benchmark filesystem
使用directio (-I), 一共1m个record (-s 1m), 每个record 大小为4kB (-r 4k), 分64个线程来读(-t 64), 使用POSIX pthread (-T). benchmark的类型由-i指定
0=write/rewrite,
1=read/re-read,
2=random-read/write,
3=Read-backwards,
4=Re-write-record,
5=stride-read,
6=fwrite/re-fwrite,
7=fread/Re-fread,
8=random_mix,
9=pwrite/Re-pwrite,
10=pread/Re-pread,
11=pwritev/Re-pwritev,
12=preadv/Re-preadv


/localfs$ iozone -I -s 1m -r 4k -i 0 -i 2 -t 64 -T
 Iozone: Performance Test of File I/O
         Version $Revision: 3.308 $
  Compiled for 64 bit mode.
  Build: linux 

 Contributors:William Norcott, Don Capps, Isom Crawford, Kirby Collins
              Al Slater, Scott Rhine, Mike Wisner, Ken Goss
              Steve Landherr, Brad Smith, Mark Kelly, Dr. Alain CYR,
              Randy Dunlap, Mark Montague, Dan Million, Gavin Brebner,
              Jean-Marc Zucconi, Jeff Blomberg, Benny Halevy,
              Erik Habbinga, Kris Strecker, Walter Wong, Joshua Root.

 Run began: Wed Apr 20 18:07:37 2011

 O_DIRECT feature enabled
 File size set to 1024 KB
 Record Size 4 KB
 Command line used: iozone -I -s 1m -r 4k -i 0 -i 2 -t 64 -T
 Output is in Kbytes/sec
 Time Resolution = 0.000001 seconds.
 Processor cache size set to 1024 Kbytes.
 Processor cache line size set to 32 bytes.
 File stride size set to 17 * record size.
 Throughput test with 64 threads
 Each thread writes a 1024 Kbyte file in 4 Kbyte records

 Children see throughput for 64 initial writers  =   69712.78 KB/sec
 Parent sees throughput for 64 initial writers  =   53411.80 KB/sec
 Min throughput per thread    =     929.10 KB/sec 
 Max throughput per thread    =    1169.92 KB/sec
 Avg throughput per thread    =    1089.26 KB/sec
 Min xfer      =     820.00 KB

 Children see throughput for 64 rewriters  =   68695.96 KB/sec
 Parent sees throughput for 64 rewriters  =   67008.63 KB/sec
 Min throughput per thread    =     844.21 KB/sec 
 Max throughput per thread    =    1173.81 KB/sec
 Avg throughput per thread    =    1073.37 KB/sec
 Min xfer      =     744.00 KB

 Children see throughput for 64 random readers  =   79020.74 KB/sec
 Parent sees throughput for 64 random readers  =   78204.49 KB/sec
 Min throughput per thread    =    1117.41 KB/sec 
 Max throughput per thread    =    1314.01 KB/sec
 Avg throughput per thread    =    1234.70 KB/sec
 Min xfer      =     872.00 KB

 Children see throughput for 64 random writers  =   44820.63 KB/sec
 Parent sees throughput for 64 random writers  =   38207.94 KB/sec
 Min throughput per thread    =     647.45 KB/sec 
 Max throughput per thread    =     748.67 KB/sec
 Avg throughput per thread    =     700.32 KB/sec
 Min xfer      =     888.00 KB


iozone test complete.

Sunday, February 06, 2011

zsh使用心得

抛弃了tcsh开始使用zsh了一段时间.zsh的特点是:fancy. 记录一下使用的心得
参考
https://wiki.archlinux.org/index.php/Zsh
http://zshwiki.org/home/
zsh workshop

使用
export var="value"


Completion System
官方介绍
发现cd补全的时候除了local-directories以外总是会出现users的选项, 很讨厌
去掉方法:"unsetopt cdablevars"

C++笔记

继承
继承方式:
  • public: 可以被任何人访问
  • protected:可以被本类以及子类访问
  • private: 只允许本类访问
虚继承: C++支持多重继承,也就是一个类可以同时有多个直接继承的基类.如果碰到如下的继承方式
A
| \ 
B  C
 \ |
   D
也就是类B和C分别继承A,同时D继承了B和C.这时候我们就需要使用以下的方法来让B和C虚继承A:
class A {
public:
    void printA() {}
};
class B:virtual public A;
class C:virtual public A;
class D:public B,public C;
如果B和C不使用虚继承,那么最终派生类D中就有可能含有两个A的作为基类,从而产生了二义性.


类型转换


C中的类型转换可以将一种类型的指针转换为任何其他类型的指针, 比如
ptr2 = (ClassFoo*) &obj;
C++中,可以有更多的选择
  • dynamic_cast <new_type> (expression) 可以将子类指针转化为父类指针
  • static_cast <new_type> (expression)可以将相关联的类指针互相转化, 比如子类指针到父类指针,或者父类指针到子类
  • reinterpret_cast <new_type> (expression)可以将任何类型指针相互转化
  • const_cast <new_type> (expression)保证转化后的指针是const


构造函数


派生类构造函数的调用顺序 如果基类的构造函数没有参数, 那么在进入派生类构造函数之前,基类构造函数将会被自动调用. 如果基类的构造函数有参数,那么派生类需要显式的调用基类构造函数.也就是所谓的"constructor chaining". 并且由于支持多继承,C++不能象Java那样使用super()
class Derived : public Base
{
    public:
        Derived(int foo, int bar)
        : Base(foo), bar_(bar)   // Call the superclass constructor in the subclass' initialization list.
        {
            // do something with bar
        }
};
explicit 关键字explicit可以修饰构造函数, 使得"converting constructor"非法.
class A {
public:
    A(int);
};
class B {
public:
    explicit B(int);
};
main() {
    A a1 = 37; // 合法
    A a2(37);  // 合法
    B b1 = 37; // 非法
    B b2(37);  // 合法
}


析构函数


virtual 有时候类的析构函数会被virtual关键字修饰, 这样可以强迫该类的派生类对象析构的时候使用派生类的析构函数而不是基类的----哪怕该对象是当做一个基类来被引用. 注意,一般说来当一个类含有虚方法的时候, 原则上就应该让析构函数为虚----因为虚方法意味着这个类多半是作为interface来使用.
class Base {
    virtual ~Base();
};
class Derived : public Base {
    ~Derived();
};
int main()
{
    Base* p = new Derived;
    delete p; // virtual destructor used to ensure that ~Derived is called
}


成员变量/函数


virtual 使用该关键字最主要的目的在于,当使用父类型的指针指向其子类的实例的时候,可以通过通过父类的指针调用实际子类的成员函. 编译器看到virtual关键字修饰的函数时,就会使用动态绑定(dynamic binding)在运行期决定函数的入口,而不是像普通的未被virtual关键字修饰的那种函数那样在编译期就静态绑定(static binding)函数入口.比如执行下面的代码
class Base {
    public:
        void foo() { cout << "Base::foo" << endl; }
        virtual void vfoo() { cout << "Base::vfoo" << endl; }
};
class Derived: public Base{
    public:
        void foo() { cout << "Derived::foo" << endl; }
        void vfoo() { cout << "Derived::vfoo" << endl; }

};
int main() {
    Base *p;
    p = (Base*) new Derived;
    p->foo();
    p->vfoo();
}
输出为
Base::foo
Derived::vfoo
static 静态成员变量是为了让同一种类的不同实例共享数据.该静态成员变量的初始化在类外,例如
int MyClass::MyStaticVar = 1;
静态成员函数与普通成员函数区别在于没有this指针,所以无法得知是针对哪个实例的操作.因此静态成员函数只能访问静态成员变量. 静态成员函数也不能被virtual, const, volatile, 以及const volatile所修饰. constconst修饰的成员函数无法是read-only, 不能修改任何调用者的成员.
class Test {
    public:
        int test;
        void foo() {test = 1;} // 合法
        void cfoo() const {  test = 1;} //非法
};
const不能修饰构造和析构函数,并且不能被非const函数重载.


inline inline函数在编译期被替换至caller的代码中,所以节省了函数调用的开销.在 C++当中,尽量用inline而不是#define.inline的成员函数定义必须在头文件中,

ref: http://www.parashift.com/c++-faq-lite/inline-functions.html#faq-9.1


变量


const 用于声明那些编译期就可以确定值的变量,这样的编译器可以比用C中的#define替换要知道更多的信息,从而给出更给力的报错信息.用const声明的变量必须立即赋值--否则之后无法对该变量进行赋值或者修改.
int main() {
   const int i = 5;
   i = 10;   // 非法
   i++;   // 非法
}

ref http://duramecho.com/ComputerInformation/WhyHowCppConst.html
volatilevolatile关键字修饰一个变量是为了通知compiler不要对这个变量进行优化----因为这个变量可能被其他thread或者被系统使用.


模版(Template)


模版类的实现必须包括在.h文件中,否则编译的时候会找不到模版类的实现.
具体原因参见http://www.parashift.com/c++-faq-lite/templates.html#faq-35.12
参数 Template可以使用class,typename参数,也可以使用非类型变量比如一个int或者char变量
template <class C, typename T, int N>
class myclass {
    T seq[N];
};
继承模版类
template <typename T>
class Base {
    T seq[N];
};
template <typename T>
class Derived: public Base< T > {
};

Tuesday, February 01, 2011

rubber

用法
rubber是一个latex的wrapper. 它免去了你先把eps -> pdf, 再latex paper.tex, 再bibtex paper 再 latex paper.tex这个复杂的过程. 你只需要一个命令就能完成
$rubber paper

问题/解决
不同的版本/平台上, rubber可能会有一些问题:
1 eps转pdf的时候报错
GS_OPTIONS=-dPDFSETTINGS=/prepress rubber --pdf -Wrefs -Wmisc paper
running: epstopdf --outfile=aaa.pdf aaa.eps...
Traceback (most recent call last):
  File "/usr/local/bin/rubber", line 4, in 
    sys.exit(Main()(sys.argv[1:]))
  File "/Library/Python/2.6/site-packages/rubber/cmdline.py", line 319, in __call__
    return self.main(cmdline)
  File "/Library/Python/2.6/site-packages/rubber/cmdline.py", line 283, in main
    ret = env.final.make(self.force)
  File "rubber/depend.py", line 157, in make
  File "rubber/depend.py", line 171, in make
  File "rubber/depend.py", line 276, in run
  File "/System/Library/Frameworks/Python.framework/Versions/2.6/lib/python2.6/subprocess.py", line 595, in __init__
    errread, errwrite)
  File "/System/Library/Frameworks/Python.framework/Versions/2.6/lib/python2.6/subprocess.py", line 1106, in _execute_child
    raise child_exception
OSError: [Errno 8] Exec format error
make: *** [pdf] Error 1

修改/usr/local/share/rubber/rules.ini
command = epstopdf --outfile=$target $source
改为
command = bash epstopdf --outfile=$target $source

2 无法使用bibtex
在我的Mac上, bibtex后面不能使用绝对路径(Ubuntu上则是好的, 很诡异).所以导致我rubber以后所有reference都不对.

Monday, January 24, 2011

gmail tips

http://email.about.com/od/gmailtips/qt/et_find_mail.htm

所有标题含有hi的邮件 "subject:hi"
所有从apc999处来信 "from:apc999"
所有寄给apc999的来信 "to:apc999"
所有未读邮件 "is:unread"
所有starred邮件 "is:starred"
2005年5月5日以前邮件 "before:2005/05/05"
2005年5月5日以后邮件 "after:2005/05/05"

Wednesday, January 19, 2011

Java笔记

Managing Source and Class Files
Java的Package概念

编译例子
javac -classpath /path/to/foo/foo.jar:./bar.jar \
      -d /path/to/mine/MyStuff_classes MyStuff.java
-classpath: 指定需要的其他目录或者jar文件
-d dirname: 按照class的packagename创建目录结构,把class文件放入相应的目录. 比如MyStuff.java是org.apc999.MyStuff, 那么按照上面的命令, 则会生成目录/path/to/mine/org/apc999/MyStuff.class

make MyStuff.jar
jar cvf MyStuff.jar -C MyStuff_classes/ .

Tuesday, January 11, 2011

[Linux]pthread

文档

史上最好的pthread Tutorial/Reference


使用

Thread
pthread_t mythread;
pthread_create(&mythread, NULL, myfunc, NULL);
pthread_join(mythread, NULL);
Mutex
1 初始化一个mutex有两种方式, 可以动态的声明:
pthread_mutex_t mymutex
pthread_mutex_init(&mymutex, NULL); 
也可以静态的声明:
pthread_mutex_t mymutex = PTHREAD_MUTEX_INITIALIZER;
2 使用mutex来serialize一段程序. mutex就好比一把锁,被锁住的程序段(pthread_mutex_lock和pthread_mutex_unlock两个语句间的code)在同一时间只能被一个thread执行. 其他需要执行这段程序的thread都会在pthread_mutex_lock这里被卡住,直到mutex被unlock才能有一个thread接着往下执行.
pthread_mutex_lock (&mymutex);
dotstr.sum += mysum;
pthread_mutex_unlock (&mymutex);
3 销毁一个mutex
pthread_mutex_destroy(&mymutex);

Spinlock
spinlock是轻量级的lock机制,比较mutex等机制,节省了process re-scheduling以及context switch等开销,所以如果确信thread不会被block很久,spinlock会非常有效.

1 申明一个spinlock
pthread_spinlock_t myspinlock;
pthread_spin_lock(&myspinlock);
2 使用spinlock上锁
pthread_spin_lock(&myspinlock);
critialnum += 1;
pthread_spin_unlock(&myspinlock);
3 销毁
pthread_spin_destroy(&myspinlock);

在MacOS 上, spinlock的原语与linux上的有所不同.
#include <libkern/osatomic.h>
OSSpinLock mylock = OS_SPINLOCK_INIT;
OSSpinLockLock(&mylock);
OSSpinLockUnlock(&mylock);

Misc

Linux上thread的实现和其他UNIX系统有一个重要区别: Linux上pthread_create实际上用一个process来运行一个thread. 所以每个thread都有自己的pid,也有自己的tid.同一个进程中的thread有同样的pid但是不同的tid. 可以用下面的代码查看pid或者tid
fprintf (stderr, "thread pid is %d\n", (int) getpid ());
fprintf (stderr, "thread tid is %d\n", (int) gettid ());

Thrift笔记

文档

Thrift的文档真是不是一般的incomplete 基本上可以说是空白. Facebook不知道干什么去了. 这是我找到的有点帮助的文档:
官方的文档: Using Thrift with C++,
网上其他的: A Intro to Thrift

安装
Thrift 的C++编译器使用了boost,所以你如果要用Thrift配合C++使用的话, 需要先安装boost.
然后下载thrift源代码,编译安装(configure, make, make install),按下不表.

HelloWorld (C++版)

第一步:用thrift描述一个service的接口,比如在Server端提供这样一个函数叫ping, Client端可以通过rpc调用ping这个函数(在thrift帮你marshall这些rpc call),ping会在Server端执行.

namespace cpp Test
service HelloWorld {
  oneway void ping()
}
将这个文件存为比如apc999.thrift. 现在把编译apc999.thrift成C++代码
$thrift --gen cpp apc999.thrift
$ls
gen-cpp/  HelloWorld.thrift/
$ls gen-cpp
apc999_constants.cpp  apc999_types.cpp  
HelloWorld.cpp  HelloWorld_server.skeleton.cpp
apc999_constants.h    apc999_types.h    
HelloWorld.h
在gen-cpp这个目录中, 我们会发现一堆thrift生成的文件. 其中HelloWorld开头的都是和HelloWorld这个service有关, 你可以在apc999.thrift中定义多个service.他们会生成不同的文件. 而apc999开头的是一些常量和类型的定义.

我们需要记住的是: Thrift帮你生成了给定Service的服务器端和客户端代码.Thrift这里的命名规则是对于Service XYZ, 它对应的服务器端代码(具体这个Service的执行)在类XYZHandler中,客户端代码(负责marshall, execute RPC)在类XYZClient中. 所以你需要用这个服务, 你只需要直接修改或者继承这些类.

第二步:编写Server端代码. thrift帮我们生成的HelloWorld_server.skeleton.cpp就是Server端代码的模板. 我们只需要往里面添加我们需要的功能实现. 比如我们添加了一行
// This autogenerated skeleton file illustrates how to build a server.
// You should copy it to another filename to avoid overwriting it.
#include "HelloWorld.h"
#include <protocol/TBinaryProtocol.h>
#include <server/TSimpleServer.h>
#include <transport/TServerSocket.h>
#include <transport/TBufferTransports.h>

using namespace ::apache::thrift;
using namespace ::apache::thrift::protocol;
using namespace ::apache::thrift::transport;
using namespace ::apache::thrift::server;

using boost::shared_ptr;
using namespace Test;

class HelloWorldHandler : virtual public HelloWorldIf {
 public:
  HelloWorldHandler() {
    // Your initialization goes here
  }

  void ping() {
    // Your implementation goes here
    printf("Hello World!\n"); //目前为止我修改的唯一一行
  }
};

int main(int argc, char **argv) {
  int port = 9090;
  shared_ptr<HelloworldHandler> handler(new HelloWorldHandler());
  shared_ptr<TProcessor> processor(new HelloWorldProcessor(handler));
  shared_ptr<TServerTransport> serverTransport(new TServerSocket(port));
  shared_ptr<TTransportfactory> transportFactory(new TBufferedTransportFactory());
  shared_ptr<TProtocolFactory> protocolFactory(new TBinaryProtocolFactory());

  TSimpleServer server(processor, serverTransport, transportFactory, protocolFactory);
  server.serve();
  return 0;
}
这个Server端代码有main函数, 所以你完全可以编译这个程序并运行.它会在9090端口监听. 如果有rpc调用ping这个函数, 它会打印出"Hello World!".

第三步:编写客户端代码.
#include "HelloWorld.h"  // HelloWorldClient这个类在helloWorld.h中被申明

#include <transport/TSocket.h>
#include <transport/TBufferTransports.h>
#include <protocol/TBinaryProtocol.h>

using namespace apache::thrift;
using namespace apache::thrift::protocol;
using namespace apache::thrift::transport;

using namespace Test;

int main(int argc, char **argv) {
  boost::shared_ptr<TTransport> socket(new TSocket("localhost", 9090));
  boost::shared_ptr<TTransport> transport(new TBufferedTransport(socket));
  boost::shared_ptr<TProtocol> protocol(new TBinaryProtocol(transport));

  HelloWorldClient client(protocol);
  transport->open();
  client.ping();
  transport->close();

  return 0;
}

Tips

Thrift生成的server端是thread safe的. 但是client端不是thread safe. 所以需要多个thread和server端通信,则每个thread需要initiate一个自己的client实例.

使用Thrift的C++库有,server端有4种不同的选择: TSimpleServer,TThreadedServer, TThreadPoolServer,以及TNonblockingServer.

当有server和client间有大量的network traffic的时候,可以使用Nagles算法来优化网络性能. Nagles算法通过缓冲来减少收发的packet数目.在Thrift中使用Nagles算法,我们只需要将上面例子中的客户端代码中下面的语句
boost::shared_ptr<TTransport> socket(new TSocket("localhost", 9090));
改为
TSocket* sock = new TSocket("localhost", 9090);
boost::shared_ptr<TTransport>  socket(sock);
然后在调用transport->open();之前 先调用sock->setNoDelay(false);就可以了

Wednesday, January 05, 2011

[Python]Package的安装

1 使用python setup.py install来安装

使用python setup.py install的时候, 默认路径是 /usr/lib/python2.x/site-packages 这样的全局路径底下. 若是没有权限写,可以自己指定安装路径
python setup.py install --home=/your/fav/dir
比如
python setup.py install --home=~


2 使用easy_install来安装egg文件
easy_install foo.egg 

Sunday, January 02, 2011

Firefox tips

给Firefox(3.5,4) 最后一个tab加上close按钮:
地址栏内键入"about:config",回车
搜索"browser.tabs.closeWindowWithLastTab",将Value设为false

Tuesday, December 21, 2010

[Linux]同步ubuntu上的时间

$ sudo aptitude install rdate
$ sudo rdate -s clock-1.cs.cmu.edu
$ sudo hwclock --systohc 

[Emacs]在Emacs中使用gdb

在Emacs中使用gdb调试程序 (推荐)
http://www.inet.net.nz/~nickrob/
An Introduction To Using GDB Under Emacs


1 M-x gdb 回车

2 Run gdb (like this): gdb --annotate=3 myprogname 回车
如果使用的是emacs 23.1 比如ubuntu 10.10当中的emacs-snapshot, 如下
Run gdb (like this): gdb -i=mi myprogname 回车

Gud->GDB-MI->Display other windows

Tuesday, November 16, 2010

[Python]String的decode, encode

string的decode用法:
str.decode(encoding="gb2312",errors="strict"
在这里我们告诉python解释器用encoding参数所指定的来对str解码.标准的encoding可以查看这里

和简体中文相关的通常有gb2312,gb18030以及gbk(大多数BBS的中文encoding)

一篇参考http://hi.baidu.com/tornadory/blog/item/2fa5f0c36cf7bd5fb219a801.html

[Linux]Profiling

gprof

gprof是GNU的profiling工具,使用的时候需要编译期的支持
使用:
1 编译:时需要使用"-pg"选项
$cc -g -c myprog.c utils.c -pg
$cc -o myprog myprog.o utils.o -pg
如果加上了"-g"选项(如上),则可以支持Line-by-line Profiling
2 运行: 执行生成的可执行文件(比如上面的myprof), 这时会生成一个"gmon.out"的文件
3 查看: 用gprof 查看profiling结果
$gprof myprof | more
参考:
gprof Quick-Start Guide

perf

perf是Linux下非常强大的profiling工具,也非常好用.
perf类似于git那样,有一堆子命令,比较常用的有record,report,annotate,stat等.
运行一个程序foo并记录下profile(默认为perf.data):
$ sudo perf record ./foo
读取刚才生成的profile结果(默认perf.data)并显示分析结果:
$ sudo perf report
输出结果类似
    49.97%  foo  filter_bench         [.] main
     5.31%  foo  libc-2.12.1.so       [.] 0x7aeab
     0.36%  foo  libstdc++.so.6.0.15  [.] operator new[](unsigned long)
注意这里libc-2.12.1.so中的symbol没有被load进来,所以无法显示具体的函数名而只能看见一个入口地址0x7aeab.
在ubuntu/debian上你可以安装libc6-dbg(注意不是libc6-dev)帮助gdb,perf这样的工具traceback.libc6-dbg包含了libc6的debug信息
$ apt-get install libc6-dbg
显示annotated code
$ sudo perf annotate
运行一个命令并查看硬件counter:
$ perf stat --repeat 10 -e cycles:u \
-e instructions:u -e l1-dcache-loads:u -e l1-dcache-load-misses:u ./foo
查看所有支持的硬件counter:
$ perf list
参考:
Linux kernel profiling with perf

OProfile

OProfile利用硬件支持来profile系统或者application. 与gprof不同,OProfile不会在binary中添加指令
启动:
1 加载oprofile
$sudo opcontrol --init
2 设置是否需要profile kernel,如果需要
$sudo opcontrol --vmlinux=/boot/vmlinux-`uname -r`
如果不需要
$sudo opcontrol --no-vmlinux
3 开始采集数据
$sudo opcontrol --start 
Using default event: CPU_CLK_UNHALTED:100000:0:1:1
Using 2.6+ OProfile kernel interface.
Using log file /home/apc999/tempsession/samples/oprofiled.log
Daemon started.
Profiler running.
4 查看oprofile状态
$sudo opcontrol --status
Daemon running: pid 13892
Separate options: none
vmlinux file: none
Image filter: none
Call-graph depth: 0
5 结束采集数据
$sudo opcontrol --stop 
6 结束oprofile daemon
$sudo opcontrol --shutdown 

参考:
OProfile Manual

Sunday, October 31, 2010

[Linux]用gs合并几个pdf文件

gs -dBATCH -dNOPAUSE -q -sDEVICE=pdfwrite -sOutputFile=finished.pdf file1.pdf file2.pdf

Thursday, October 21, 2010

PPT 热键

Press F5 in PowerPoint/Windows or Control-Shift-S in PowerPoint X/Mac to start a slide presentation from the beginning

Press Shift+F5 in PowerPoint 2003 or Control+Shift+B in PowerPoint X/Macintosh to start a presentation from the current slide

Friday, October 15, 2010

手机配置

Apple iPhone 4
  • CPU: Apple A4 - fully compatible with ARM Cortex-A8, running at 1 GHz, 64 L1 Cache, 640 L2 Cache
  • Memory: 512 MB eDRAM
  • Storage: 16 GB or 32 GB flash memory
Nokia N900
  • CPU: ARM Cortex-A8, running at 600 MHz
  • Memory: 256 MB
  • Storage: 32 GB internal; Expandable to up to 48 GB with an external microSD card

Thursday, October 14, 2010

Cocoa编程笔记(update中)

Cocoa是Mac上使用的图形界面framework, 简单说来就是一个库使开发人员可以定制自己的基于GUI的 Application。Cocoa使用的语言是Object-C(参见我的Object-C笔记)。 Cocoa编程的学习曲线比其他GUI编程的要陡,因为有很多概念要理解。我在学习过程中,参照如下的一些tutorial或者文档:

Cocoa Fundamental Guide:这是最核心最基础的文档。介绍了最重要的概念

Cocoa Event Handling:Cocoa中如何处理事件

Introduction to Text System User Interface Layer,介绍了比如如何programatically 创建一个NSTextView,添加至NSScrollView,如何调整Text边距等等.

Introduction to Text Editing Programming Guide for Cocoa, 介绍如何使用Cocoa的Text System来完成编辑工作,比如key binding, 如何delegate message等.

一个简单界面的Cocoa Application:最最简单的一个Application.如果想学习一个最简单的Cocoa Application,从这个文档看起.

Model-View-Control模型

Cocoa中广泛使用了MVC这种的Design Pattern,把一个application功能分解为如下三个部分:

Model objects: 负责逻辑处理,不直接和用户界面打交道
View objects: 用户界面.比如label, textfield等
Controller objects: 连结Model和View, 比如处理界面送来的用户action,应用后台逻辑做出update等


内存管理
alloc, init, dealloc, retain, release, autorelease. 所有从NSObject继承而来的类都有这些方法,这些涉及到内存管理.

alloc: 从内存中分配一块内存,但仅仅是获得一块内存空间,未作任何初始化
init:初始化一个类,类似于C++中的构造函数,一般和alloc配合使用:
id  myObject = [[NSString alloc] init];
dealloc: 销毁一个类,释放内存空间
[myObject dealloc];
retain: 将一个对象的引用计数加1
[myObject retain];
release: 将一个对象的引用计数减1
[myObject release];
autorelease:每当一个对象得到autorelease消息,这个对象就将被添加到autorelease pool当中. 当改eventloop结束时,所有autorelease pool当中的对象将被release.通常一个method要返回一个对象的时候,autorelease这个对象是个好主意.
- (NSString)autoreleasedString
{
  NSString *string = [[NSString alloc] initWithString:
      @"The Sender of this message will never see this string…"];
  [string autorelease]; // we have to do this or we'll get a memory leak
  return string;
}


神秘的IBAction和IBOutlet?

经过预处理以后,IBAction实际上就是void而IBOutlet实际上根本就是一个空的宏(见定义在NSNibDeclarations.h).它们的作用是在于作为一种syntax sugar,提醒Interface Builder,"嗨,这几个被我修饰的变量或者函数是你应该知道的~".


事件处理(Event Handling)
有两种Message: 由外部设备比如键盘或者鼠标发起的Event message,以及由其他对象发起的Action message.

Event message 通常已知,所以NSResponder提供了声明以及缺省的实现.
NSResponder是一个抽象类.而Cocoa中最核心的三个类NSApplication, NSWindow, 以及 NSView都继承了NSResponder.

比如我们要处理mouseDown这个事件,我们可以继承一个NSView类(或者NSView的子类,比如NSTextView,NSTabView),然后重载mouseDown:这个方法。如果一个NSWindow上有多个NSView(或其子类), 则应该重载最上面的View,否则盖在底下的不能接受到该消息

- (void)mouseDown:(NSEvent *)theEvent {
    // determine if I handle theEvent
    // if not...
    [super mouseDown:theEvent];
}


Delegate
Common mistakes with delegation in Cocoa
一个在NSImageView中delegate mouseDown等消息的例子:
http://it.toolbox.com/blogs/macsploitation/adding-delegates-to-nsviews-21138

Text System
NSTextStorage 是NSMutableAttributedString的子类. 一般作为NSTextView 的text repository. Introduction to Text System Storage Layer Overview

NSTextView 和用户打交道的界面
NSTextContainer:Introduction to Text Layout Programming Guide


NSScrollView: Introduction to Scroll View Programming Guide for Cocoa
NSClipView:


NSParagraphStyle:Introduction to Rulers and Paragraph Styles

一个超级简单的Cocoa Text System Application
HelloWorld.h:
#import 

@interface HelloWorld : NSObject  {
    NSWindow *window;
 
 NSTextStorage *textStorage;
 NSLayoutManager *layoutManager;
 NSTextContainer *textContainer;
 NSTextView *textView;
}

@property (assign) IBOutlet NSWindow *window;

@end
HelloWorld.m
#import "HelloWorld.h"

@implementation HelloWorld

@synthesize window;

- (void)applicationDidFinishLaunching:(NSNotification *)aNotification {
 // Insert code here to initialize your application 
 
 //setup textStorge
 textStorage = [[NSTextStorage alloc] initWithString:@"123abcde\n456"];
 
 //setup layoutManager
 layoutManager = [[NSLayoutManager alloc] init]; 
 [textStorage addLayoutManager:layoutManager]; 
 [layoutManager release];
 
 //setup textContainer
 NSRect cFrame = [[window contentView] frame];  
 textContainer = [[NSTextContainer alloc] initWithContainerSize:cFrame.size];
 [layoutManager addTextContainer:textContainer]; 
 [textContainer release];
 
 //setup textView
 textView = [[NSTextView alloc] initWithFrame:cFrame textContainer:textContainer]; 
 [window setContentView:textView]; 
 [window makeKeyAndOrderFront:nil]; 
 [textView release];
}

@end


常用数据结构:
NSArray: 类似list, 不能添加元素
Objective-C Tutorial: NSArray读取index位置的元素
[myArray objectAtIndex:index]

NSMutableArray:一个类似python中list的存在.可以通过addObject:来添加元素.

NSDictionary
NSMutableDictionary:一个类似于python中dict的存在,提供setObject:forKey:和removeObjectForKey:


Do things Programatically

获取中文encoding
http://www.cocoadev.com/index.pl?CharacterEncoding
NSStringEncoding gb18030 = CFStringConvertEncodingToNSStringEncoding 
    (kCFStringEncodingGB_18030_2000);
用中文encoding读文件
[options setObject:absoluteURL
    forKey:NSBaseURLDocumentOption];
[options setObject:[NSNumber numberWithUnsignedInteger:gb18030] 
    forKey:NSCharacterEncodingDocumentOption];
[options setObject:NSPlainTextDocumentType
    forKey:NSDocumentTypeDocumentOption];
 
NSAttributedString *fileContents = [[NSAttributedString alloc]
      initWithURL:absoluteURL options:options 
    documentAttributes:NULL error:outError];
NSTextView背景设为透明
[[textView enclosingScrollView] setDrawsBackground:NO];
[textView setDrawsBackground:NO];
NSImageView显示图片
NSImage *image = [NSImage imageNamed:@"yellow_background.bmp"];
[imageView setImage: image];
给NSTextView和NSTextContainer之间添加空白区域
[myNSTextView setTextContainerInset:NSMakeSize (width, height)];
使用NSLog,NSAssert输出信息,帮助调试
NSLog(@"init, %p, %p",backgroundImage, textView);
NSAssert([myWindow delegate] == self, @"You forgot to connect the window delegate.!");

NSLog 格式化字符串


其他
If you want to name your NSDocument subclass something other than MyDocument (the default name), change the name in Interface Builder and wherever it occurs in the Document header (.h) and implementation (.m) files. You must also change the name under the NSDocumentClass key in the Info.plist file.

http://developer.apple.com/library/mac/#documentation/Cocoa/Conceptual/TextArchitecture/Tasks/TextEditor.html#//apple_ref/doc/uid/20001798-CJBHAJJJ

Monday, October 11, 2010

[Math]凑硬币

有6分9分和25分的硬币,不能用这3种硬币凑出来的面值最大是多少

Sol: General problem 叫 Coin Problem

对于这题, 考察面值N分
(1) N = 3k, 当k>1的时候都可以用6和9凑出来
(2) N = 3k + 1, 当k>=10的时候, N-25是3的倍数且大于等于6,可以用(1)得出
(3) N = 3k + 2, 当k>=18的时候, N-50是3的倍数且大于等于6,可以用(1)得出

所以最大不能表出的面值为53

Sunday, October 03, 2010

[Math]扔骰子

Q: 能否重新设计两个六面骰子,每个骰子上是正整数并且两个骰子之和的分布与两个正常骰子之和相同(Is it possible to change the numbers on two six sided dice to other positive numbers so that the probability distribution of their sum remains unchanged?)

Sol: 考虑两个普通骰子之和的分布的generating function:
(x/6+x^2/6+x^3/6+x^4/6+x^5/6+x^6/6)*(x/6+x^2/6+x^3/6+x^4/6+x^5/6+x^6/6)
= (x/6+2*x^2/6+2*x^3/6+x^4/6)*(x/6+x^3/6+x^4/6+x^5/6+x^6/6+x^8/6)

也就是说可以设计第一个骰子的六面为(1,2,2,3,3,4),第二个骰子的六面为(1,3,4,5,6,8)
这样可以满足新的骰子的和的分布和从前相同

Friday, September 24, 2010

[Linux]resize image

比如我有一个image叫old.png想要resize成320x240的文件,可以使用如下命令
convert -geometry  320x240 old.png new.png
注意new.png依然保持了原图片的横宽比例,所以未必能得到你想要的大小, 如果不想保持横宽比例
convert -resize  '320x240!' old.png new.png

[Math]老鼠,毒药和酒

如果你有9瓶酒,其中一瓶有毒但你不知道究竟是哪一瓶.幸运的是你有两只老鼠可以拿来测试--老鼠碰到毒酒立刻就被毒死了.给定这两只老鼠,如果测试两轮(一轮指你可以对部分或者全部老鼠喂一次酒),如何能够测试出哪瓶是毒酒? 进一步,如果给你5只老鼠,如何在两轮内找出243瓶酒中哪一瓶是毒酒.

Sol:
part1
给酒编号,编号为1 2 3的酒喂老鼠A, 编号为3 4 5的酒喂老鼠B.
case1 A alive, B alive -> poised in 6, 7, 8, 9.
case2 A dead, B alive -> poised in 1, 2
case3 A alive, B dead -> poised in 4, 5
case4 A dead, B dead -> poised is 3, done

case1的情况下, 使用A测试6,7, 使用B测试7,8就可以得到最后结果
case2和case3的情况下, 让活着的一只老鼠喝一瓶酒,也可以得到结果.

part2
让我们用N(k,1)指代给定k只老鼠,只能测试一轮的情况下,最多能找出多少瓶酒中的一瓶毒酒.不难发现N(k,1)=2^k (特别的N(0,1)=1 也就是说一只老鼠都不给,只能断定:只有1瓶的时候这瓶一定是毒酒)

N(k,2)=N(k,1)*C(0,k) + N(k-1,1)*C(1,k) + N(k-2,1)*C(2,k) + ... + N(0,1)*C(k,k)
= 3^k
=> N(5,2)=243

Thursday, September 23, 2010

[Python]几个常用数据结构的高效实现

Python中最广为熟知的container就是list和dict了. 但是对于特定的用途, 这二者未必是最高效的.比如判断容器中是否包括x(x in container),如果容器是list就需要O(n)的时间.而使用set的话这个就只需要O(1)的时间. 我的血泪教训是: 在list很长的时候, x in list这个操作是非常非常低效的.一个好的主意是在另一个set容器来保存membership的信息.

集合(Set)
set是Python的built-in类型,对于membership testing, removing duplicates 的操作非常高校(O(1)时间).另外对集合操作也非常方便.如果对容器元素的顺序没有要求,set是非常好的选择对象
>>>s= set()
>>>s.add(1)
>>>s.add(2)
>>>s.remove(1)  #throw exception if not in set
>>>s.discard(1) #remove if present
>>>print set([1,2,3]) | set([3,4,5]) #union
set([1, 2, 3, 4, 5])
>>>print set([1,2,3]) & set([3,4,5]) #intersection
set([1])
>>>print set([1,2,3]) - set([3,4,5]) #difference
set([1, 2])
>>>print set([1,2,3]) ^ set([3,4,5]) #symetric difference
set([1, 2, 4, 5])
栈(Stack)
栈的特点是先进后出(FILO).built-in的list用来实现栈非常合适.对于append和pop的实现非常高效.

FIFO队列(FIFO Queue)
队列的特点是先进先出(FIFO). list用来实现队列不够有效.collections.deque可以弥补这一缺点(fast appends and pops from both ends)
>>>from collections import deque
>>>queue = deque()
>>>queue.append(1)
>>>queue.append(2)
>>>queue.appendleft(3)
>>>print queue
deque([3, 1, 2])
>>>queue.pop()
2
>>>queue.popleft()
3

利用deque,我们可以实现一个时间上高效的FIFO queue:
class FIFOQueue():
    def __init__(self):
        self.queue = deque()
        self.counter = itertools.count(1)    # unique sequence count
        self.task_finder = {}                # mapping of tasks to entries

    def append(self, task):
        if debug:
            print "FIFOQueue.append "+repr(task)

        if task in self:
            return
        count = next(self.counter)

        entry = [count, task]
        self.task_finder[task] = entry
        self.queue.append(entry)
        if debug:
            print "FIFOQueue.append "+repr(task)+" done"

    def top(self):
        if debug:
            print "FIFOQueue.top "
        while self.queue:
            count, task  = self.queue[0]
            if count:
                if debug:
                    print "FIFOQueue.pop "+repr(task)+" done"
                return task
            else:
                self.queue.popleft()
        if debug:
            print "FIFOQueue.top none"
        return None

    def pop(self):
        if debug:
            print "FIFOQueue.pop "
        while not self.top():
            continue
        if self.queue:
            entry  = self.queue.popleft()
            count, task = entry
            assert(count != None)
            assert(self.task_finder[task] == entry)
            del self.task_finder[task]
            if debug:
                print "FIFOQueue.pop "+repr(task)+" done"
            return task
        if debug:
            print "FIFOQueue.pop none"
        return None

    def remove(self, task):
        if debug:
            print "FIFQueue.remove "+repr(task)
        if task not in self:
            return
        entry = self.task_finder[task]
        assert(entry[0] != None)
        entry[0] = None
        del self.task_finder[task]
        if debug:
            print "FIFOQueue.remove "+repr(task)+" done"

    def __len__(self):
        return len(self.task_finder)

    def __contains__(self, task):
        return self.task_finder.has_key(task)

    def __repr__(self):
        return repr(self.queue)
这个实现的好处在于可以常数时间删除一个元素以及在常数时间内判定一个元素是否属于这个queue

优先队列(Priority Queue)
使用堆(heap)实现的优先队列(priority queue)可以在O(1)时间内得到队列中最小元素,O(logn)时间内插入或者删除一个元素.我通常在simulator中会使用priority queue来管理所有事件.

Python提供了heapq来实现.值得注意的是heapq并不是一个容器,而是操作在list上的一系列的heap算法(包括heappush,heappop,heapify)等.http://docs.python.org/library/heapq.html给出了用这一些算法实现堆排序(heapsort)以及优先队列的. 不过在那个优先队列的例子里有一点小bug. 这里是我给出的代码
import itertools
from heapq import heappush, heappop
class PriorityQueue():
    def __init__(self):
        self.pq = []                         # the priority queue list
        self.counter = itertools.count(1)    # unique sequence count
        self.task_finder = {}                # mapping of tasks to entries
        self.size = 0
 
    def add_task(self, priority, task, count=None):
        if count is None:
            count = next(self.counter)
        entry = [priority, count, task]
        self.task_finder[task] = entry
        heappush(self.pq, entry)
        self.size  += 1

    def pop_task(self):
        while self.pq:
            entry = heappop(self.pq)
            priority, count, task = entry
            if self.task_finder[task] == entry:
                del self.task_finder[task]
            if count is not None:
                self.size -= 1
                return (priority, task)
        return None


    def del_task(self, task):
        entry = self.task_finder[task]
        if entry[1] != None:
            self.size -= 1
        entry[1] = None

    def reprioritize(self, priority, task):
        entry = self.task_finder[task]
        self.add_task(priority, task, entry[1])
        if entry[1] != None:
            self.size -= 1
        entry[1] = None

    def __len__(self):
        return self.size

Intel CPU Lineup, roadmap

从Intel的主页来看Processor产品线的划分

按照处理器的品牌

  • Core(酷睿)主要是针对中端到高端的处理器.
    - 早期(2006年)的32位CPU使用NetBurst架构,分为Core Solo(单核)和Core Duo(双核)
    - 升级到64位CPU以后, 使用了Core架构,从低端到高端分为Core 2 Solo, Core 2 Duo, Core 2 Quad和Core 2 Extreme
    - 升级到Nehalem微架构以后, 从低端到高端可以具体划分为Core i3, Core i5, Core i7. i3,i5,i7在不同的时间使用不同的微架构. 这3个系列的区别可见下表
  • Pentium
  • Celeron
  • Atom
  • Xeon(至强), 主要针对服务器以及工作站

按照处理器的微架构
  • Sandy Bridge
  • 在2011年1月份发布. 苹果在2月份就宣布新的Macbook Pro使用基于Sandy Bridge 的i5和i7. 相比上代的Nehalem的Westmere架构,同样为32nm,而这次的革新意义是在于完美的将CPU和GPU真正融合在了一起。64KB L1 Cache (32KB iCache + 32KB dCache) , 256KB L2 Cache per core.与集成的GPU共享L3 Cache
  • Nehalem
  • 2008年9月发布(i7). 重新引入超线程(Hyper Threading)技术使得每一个core可以同时运行2个线程

Intel Microarchitecture 所有Intel Microarchitecture列表 这是从wiki上偷来的图,展示从Netburst和P6到Nehalem的变迁
Intel CPU的家族史: Intel CPU 家族一覽 - 桌上電腦(上篇) Intel CPU 家族一覽 - 桌上電腦(中篇) Intel CPU 家族一覽 - 桌上電腦(下篇)

Monday, September 20, 2010

[Python]glob

glob用于寻找符合pattern的文件名/目录名, 相当于shell下的ls, 很好用
>>import glob
>>glob.glob(”/path/to/me/*.txt”)
['./1.txt', './2.txt']

Monday, September 13, 2010

[Linux]查看系统信息相关命令

Linux版本信息

$uname -a
Linux gs7600 2.6.32-24-generic #42-Ubuntu SMP Fri Aug 20 14:21:58 UTC 2010 x86_64 GNU/Linux

CPU信息


$cat /proc/cpuinfo

Cache大小

cat /sys/devices/system/cpu/cpu0/cache/index*/size
系统内存使用信息

系统当前内存使用状况
$cat /proc/meminfo
或者
$free -m

如果要看具体某个进程的内存使用情况,/proc/pid/底下有一些 比如statm, maps, smaps, status.

mem_usage.py是另一个脚本可以查看具体进城的内存使用. 比如要查看pid为4418的进程
$mem_usage.py 4418
Mapped memory:
               Shared            Private
           Clean    Dirty    Clean    Dirty
    r-xp    8364        0    15484        0  -- Code
    rw-p       0        0        0     1704  -- Data
    r--p     704        0      648      516  -- Read-only data
    ---p       0        0        0        0
    rw-s       0      304        0        0
    r--s     800        0       40        0
   total    9868      304    16172     2220
Anonymous memory:
               Shared            Private
           Clean    Dirty    Clean    Dirty
    rwxp       0        0        0     1340  -- Writable code (stack)
    r-xp       0        0        0        0
    rw-p       0        0        0    81048  -- Data (malloc, mmap)
    ---p       0        0        0        0
   total       0        0        0    82388
   ----------------------------------------
   total    9868      304    16172    84608

更多详细的可以参见http://elinux.org/Runtime_Memory_Measurement

进程的信息

最基本的命令就是广为人知的top.
htop是更fancy的一个版本, 可以看到每个线程使用的内存和CPU

当前mount的设备
$cat /proc/mounts 
或者等同的
$mount

I/O的统计信息

$ iostat
Linux 2.6.38-8-server (fawnserver)  04/15/2011  _x86_64_ (12 CPU)

avg-cpu:  %user   %nice %system %iowait  %steal   %idle
           4.47    0.00    2.07    0.16    0.00   93.30

Device:            tps   Blk_read/s   Blk_wrtn/s   Blk_read   Blk_wrtn
sda               6.24        51.31      1011.76     676334   13337192
sdb               0.00         0.03         0.00        408          0
$ iotop
Total DISK READ: 0.00 B/s | Total DISK WRITE: 0.00 B/s
  TID  PRIO  USER     DISK READ  DISK WRITE  SWAPIN     IO>    COMMAND                                                                       
    1 be/4 root        0.00 B/s    0.00 B/s  0.00 %  0.00 % init
    2 be/4 root        0.00 B/s    0.00 B/s  0.00 %  0.00 % [kthreadd]
    3 be/4 root        0.00 B/s    0.00 B/s  0.00 %  0.00 % [ksoftirqd/0]
    4 be/4 root        0.00 B/s    0.00 B/s  0.00 %  0.00 % [kworker/0:0]
...

网络流量的统计信息

每块网卡的收发packet数目:
$cat /proc/net/dev
Inter-|   Receive                                                |  Transmit
 face |bytes    packets errs drop fifo frame compressed multicast|bytes    packets errs drop fifo colls carrier compressed
    lo:896689377 11170911    0    0    0     0          0         0 896689377 11170911    0    0    0     0       0          0
  eth0:708410727 3925021    0    0    0     0          0      5468 84085137  732531    0    0    0     0       0          0

bwm-ng:基于/proc/net/dev信息,动态显示各个网卡的traffic

iftop:动态显示各台主机之间traffic

nethogs: 如果要查看每个process使用的网络情况,可以使用
http://www.ubuntugeek.com/nethogs-net-top-tool-grouping-bandwidth-per-process.html

能耗

如果是基于Intel的CPU, 可以用powertop查看power consumption

内核消息

dmesg将内核消息输出至标准输出
$dmesg

Ref:

http://www.ubuntugeek.com/category/monitoring
http://www.cyberciti.biz/tips/how-do-i-find-out-linux-cpu-utilization.html

Thursday, September 09, 2010

[Linux/Mac]删除所有.svn文件夹

用于删除一个目录下(以及其子目录下)所有的.svn目录
$ rm -rf `find . -type d -name .svn`

Monday, July 26, 2010

tbb: Intel® Threading Building Blocks笔记

tbb(Threading Building Blocks)是Intel开发的一个C++模板库, 类似于STL. 其特点是针对对于多核(multi-core)CPU的优化.提高在多线程的环境下程序并发性. tbb提供了多种类似于STL但高度并行的容器类.

安装

Ubuntu:
sudo apt-get install libtbb2 libtbb-dev libtbb-doc
MacOS上:
sudo port install tbb
编译

g++ -ltbb foo.cpp
使用

concurrent_hash_map
此容器是类似于STL中的map的存在. 同std::map一样,concurrent_hash_map为一个从Key类型读取T类型的容器. 为提高并发性,我们需要用accessor或者const_accessor两种不同方式访问此容器的某元素.accessor和const_accessor均为智能指针,其中accessor写和修改访问,会lock相应的key直到访问结束.而const_accessor用于只读方式访问,这样可以同时有多个不同的const_accessor同时指向同一个key.区分不同的访问方式有助于增加程序的并发性.


#include <iostream>
#include <string>
#include <tbb/concurrent_hash_map.h>

using namespace tbb;
using namespace std;
typedef concurrent_hash_map<string,string> CacheTable;

int main() {
    CacheTable cache;

    // insert an element to the map
    CacheTable::accessor a;
    cache.insert(a, s);
    a->second = "value1";
    a.release();
    
    // look for an element in the map
    CacheTable::const_accessor ca;
    if (cache.find(ca, "key1"))
         cout << "the value is " << ca->second << endl;
    else
         cout << "not found" << endl;

    // iterate over the map
    for(CacheTable::const_iterator itr=cache.begin(); itr!=cache.end(); ++itr)
         std::cout << itr->first << " - " << itr->second << std::endl;

}
concurrent_queue
一个类似于stl中queue的存在. 提供包括push(item),pop(item)以及try_pop(item)等等的操作.
下面是对于一个concurrent_queue的iteration操作:
#include <iostream>
typedef concurrent_queue::const_iterator iter;
for(iter i(q.unsafe_begin()); i!=q.unsafe_end(); ++i ) {
   do sth 
}

atomic
如果atomic< your data type> x, 以下操作为原子操作
= x  read the value of x
x =  write the value of x, and return it
x.fetch_and_store(y)  do y=x and return the old value of x
x.fetch_and_add(y)  do x+=y and return the old value of x
x.compare_and_swap(y,z)  if x equals z, then do x=y. In either case, return old value of x